MQTT: communication protocol
 MQTT is a protocol that allows devices to communicate with each other over the internet or a local network. It is designed for IoT applications, where devices need to exchange data in a reliable, efficient, and secure way.
How does MQTT work?
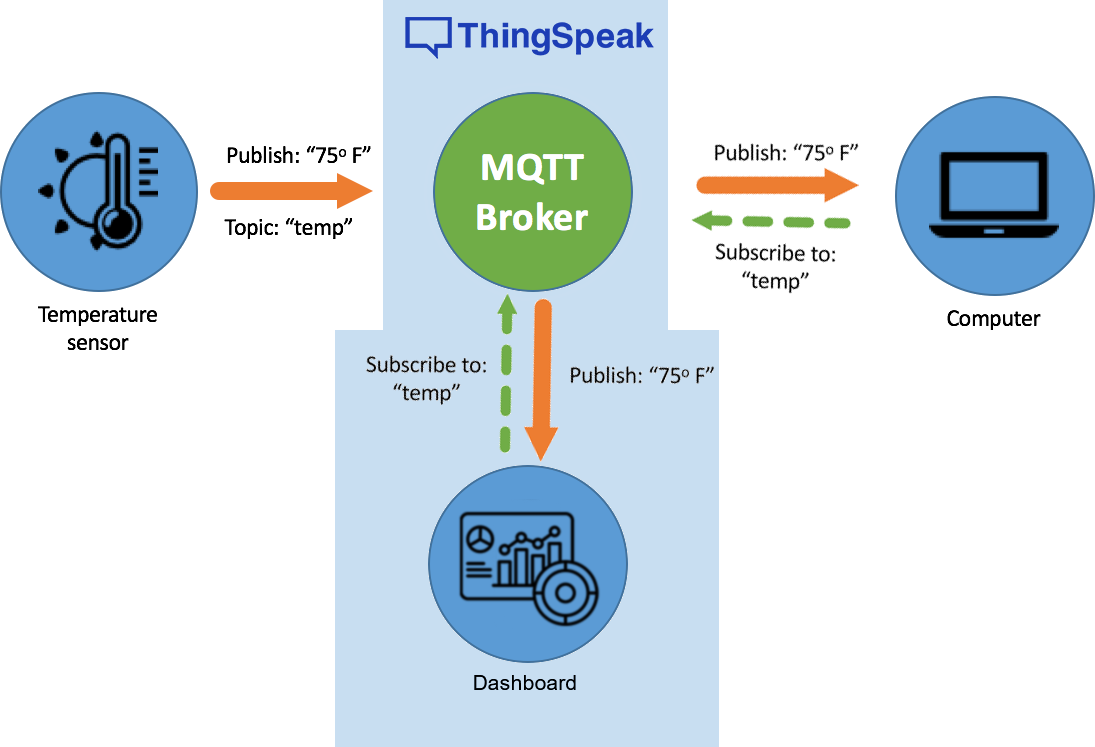
MQTT works by using a publish-subscribe pattern, where devices can send (publish) or receive (subscribe) messages on different topics.
A topic is a name that identifies a specific category of information, such as temperature, humidity, or motion. A device can publish messages to any topic it wants, and other devices can subscribe to any topic they are interested in. For example, a sensor can publish its readings to a topic called temp, and a computer or other device can subscribe to that topic to eventually show the readings on a screen.
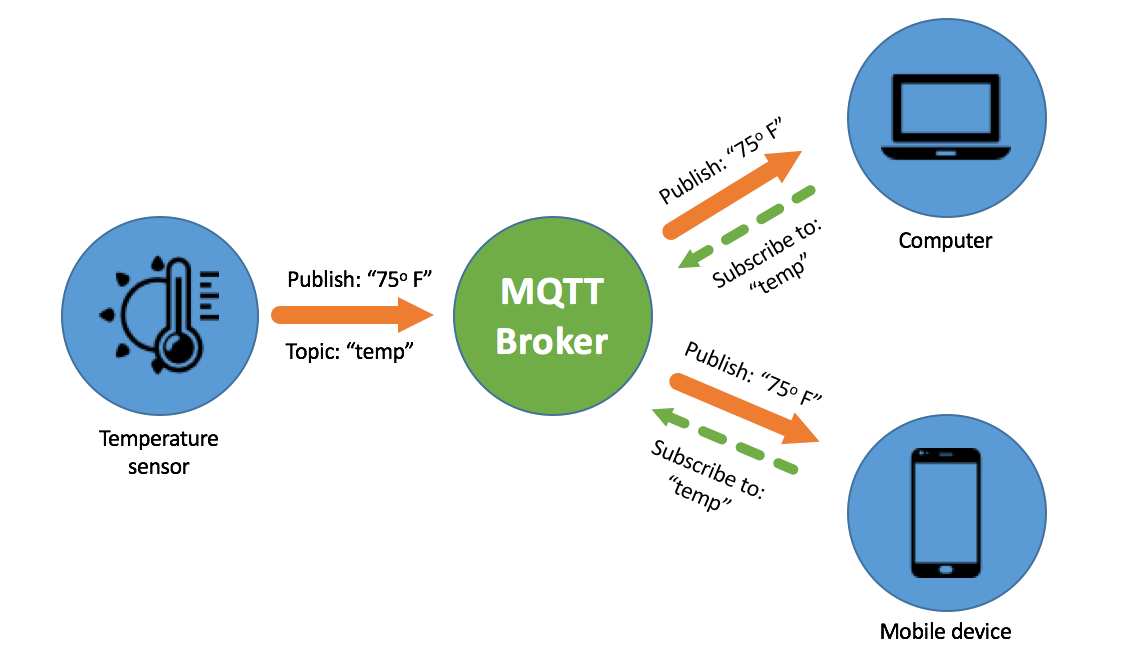
A central component of MQTT is the broker, which is a server that connects all the devices and manages the message distribution. The broker receives the messages from the publishers and forwards them to the subscribers who have registered for the same topic. The broker also handles the authentication and encryption of the messages, as well as the quality of service levels, which determine how reliably the messages are delivered:
The authentication and encryption of the messages are the mechanisms that ensure the security and privacy of the MQTT communication. Authentication verifies the identity of the clients and the broker using for example username and password, while encryption protects the messages from being intercepted or tampered with by unauthorized parties. This is naturally related to the value driver 🔐 Security.
The quality of service levels are the agreements between the sender and the receiver of the messages that define the level of delivery guarantee for a specific message. This is related to the value driver 📶 Reliability. MQTT supports three quality of service levels, which are:
- QoS 0: At most once. This is the lowest level of service, where the sender does not expect an acknowledgment or guarantee of message delivery. The message is sent only once and may be lost or duplicated in case of network failures or connection interruptions. This level is suitable for messages that are not critical or can be easily repeated, such as sensor readings or status updates.
- QoS 1: At least once. This is the medium level of service, where the sender expects an acknowledgment of message delivery and will store and retransmit the message until it receives the acknowledgment. The message is guaranteed to be delivered, but may be duplicated in case of network failures or connection interruptions. This level is suitable for messages that are important and need to be delivered, but can tolerate duplicates, such as commands or alerts.
- QoS 2: Exactly once. This is the highest level of service, where the sender and the receiver exchange four messages to ensure that the message is delivered exactly once and without duplication. The message is guaranteed to be delivered and not duplicated, but requires more resources and bandwidth than the other levels. This level is suitable for messages that are critical and need to be delivered exactly once, such as financial transactions or configuration changes.
What are the benefits of MQTT?
MQTT is a lightweight protocol, which means it uses minimal resources and bandwidth. This makes it suitable for IoT devices that have limited memory, processing power, or battery life. MQTT also supports unreliable networks, where devices may have intermittent or low-quality connections. MQTT can resume the communication session and deliver the messages once the connection is restored if one uses the right quality of service level.
What are the requirements of MQTT?
To use MQTT, you need to :
- have an internet connection or a local network that can connect your devices to the broker.
- install an MQTT client library on your device, which will handle the communication with the broker. There are many MQTT client libraries available for different programming languages and platforms, such as Eclipse Paho MQTT Python library.
- choose an MQTT broker service, which can be either hosted on the cloud or on your own server. Some examples of cloud-based MQTT brokers are AWS IoT Core, Google Cloud IoT Core or ThingSpeak.
To summarize, MQTT is a protocol that enables IoT devices to communicate with each other in a simple, reliable, and flexible way. It uses a publish-subscribe pattern, where devices can send or receive messages on different topics. It relies on a broker, which is a server that connects the devices and manages the message distribution. It is a lightweight protocol, which is ideal for IoT devices that have limited resources or unstable networks. It requires an internet connection, an MQTT client library, and an MQTT broker service to work.
ThingSpeak: cloud platform with descriptive analytical tools
 ThingSpeak is a cloud-based platform that enables you to build IoT applications. It allows you to collect, store, analyze, and visualize data from internet-connected devices using various services and tools. You can also integrate your data with web services and other APIs to create IoT solutions.
ThingSpeak is an open-source software written in Ruby, and was originally launched by ioBridge in 2010 as a service in support of IoT applications. ThingSpeak is now part of MathWorks, the company behind MATLAB, allowing it to leverage the capabilities of MATLAB for IoT analytics and visualizations. You can also access your ThingSpeak data from MATLAB Online or MATLAB desktop. You can learn more about ThingSpeak and its features by visiting the official website and watching this video.
Some of the features of ThingSpeak are:
Channels: Channels are the core elements of ThingSpeak that store the data you send to the platform. You can also share your channels with other users or groups for collaboration. You can create private or public channels, and customize them with things like:
- 8 data fields, which represent MQTT topics
- 3 location fields, where you can set the location of the spot you are collecting data about
Devices: Devices are the representations of your real-life devices or equipment that communicate with ThingSpeak. You can use any device that supports HTTP or MQTT protocols to send data to your channels. With MQTT a device would publish data to one or more fields of a channel, as the fields represent MQTT topics. You need to create a ThingSpeak device and use the generated credentials to authorize your device to access your channels.
MQTT broker: ThingSpeak provides an MQTT broker service that lets you publish and subscribe to topics using the MQTT protocol. Once again, the fields in a channel represent these MQTT topics. You can use any MQTT client to communicate with your ThingSpeak channels, as long as you have a ThingSpeak MQTT device and the corresponding credentials.
MATLAB analytics and visualizations: ThingSpeak has MATLAB built in so that you can perform advanced data analysis and visualization on your live or historical data. You can use MATLAB functions and toolboxes to calculate statistics, find trends, filter outliers, create plots, and more. You can also schedule MATLAB analysis to run automatically or trigger it based on certain conditions. The visualisations automatically are subscribed to the fields
Apps and plugins: ThingSpeak has a variety of apps and plugins that allow you to extend the functionality of your channels and interact with other services. For example, you can use the React app to send alerts or execute actions based on your data, or use the ThingTweet plugin to send tweets from your devices.
🛠 Sending data to ThingSpeak from the Orange Pi via MQTT
To transmit the values to ThingSpeak via MQTT, you need to first create a MathWorks (ThingSpeak) account:
- Go to https://thingspeak.com/
- Click Get Started For Free
- Click No account? Create one!
- Confirm your account
- Click Continue on the page where you put in your details
- Create a password
- Login with your account
- Complete the school info: Thomas More & IoT Essentials
When you are logged in to ThingSpeak you will create a ThingSpeak channel and create a ThingSpeak MQTT device:
To create a ThingSpeak channel, you need to click Channels > MyChannels, and then click New Channel. You can check the boxes next to the fields you want to use, and enter the channel settings such as name, description, and field labels. You can also choose to make your channel public or private, and enable or disable comments. After you save your channel, you can see the channel ID, API keys, and other options on the channel page. For our example we will take:
- Name: "Room monitoring"
- Description: "This room is being monitored by sensors connected to an Orange Pi 3 LTS"
- Field 1: "Lighting"
A completed new channel already shows graphs for the added fields To create a ThingSpeak MQTT device, you need to click Devices > MQTT, and then click Add a new device. You need to provide a device name, an optional description, and authorize the channels you want to use for publish and subscribe.
⚠ At this point download your credenials in plaintext! ⚠ ThingSpeak does not store a copy of your device's MQTT password. You need to use these credentials in your MQTT client to communicate with ThingSpeak.
For our example we wil name the device what it will represent in the real world, our Orange Pi: "Orange Pi 3 LTS".
Click Download Credentials > Plain Text as said before. Use the saved credentials in the code below.
The next step is to work on the Python code:
- Install the
paho-mqttlibrary Python package usingpip. - Modify the Python script that reads the BH1750 values to publish the data to the ThingSpeak channel using the MQTT topic and credentials. The
channelIDcomes from the Channel Settings tab of your newly created Channel. The other three come from the credentials in plaintext you just downloaded while making your device. You can use thepaho-mqttPython package to implement the MQTT client.
Here is an example of a Python script that reads the BH1750 values and transmits them to ThingSpeak via MQTT:
import smbus
import adafruit_bh1750
import paho.mqtt.client as mqtt

# Create an I2C bus object with 0 referring to the i2c0 bus enabled on the Orange Pi
bus = smbus.SMBus(0)

# Create a BH1750 object with the I2C address 0x23
sensor = adafruit_bh1750.BH1750(bus, 0x23)

# Define the ThingSpeak MQTT credentials and topic
channelID = "ENTER_YOUR_THINGSPEAK_CHANNEL_NUMBER"
mqttUserName = "ENTER_YOUR_MQTT_USERNAME"
clientID = "ENTER_YOUR_MQTT_CLIENT_ID"
mqttPass = "ENTER_YOUR_MQTT_PASSWORD"
topic = "channels/" + channelID + "/publish/" + mqttPass

# Define the MQTT server and port
server = "mqtt.thingspeak.com"
port = 1883

# Create an MQTT client object
client = mqtt.Client(clientID)

# Set the username and password for the MQTT client
client.username_pw_set(mqttUserName, mqttPass)

# Connect to the MQTT server
client.connect(server, port)

# Read the light level in lux
light = sensor.readLightLevel()

# Print the result
print("Light: {:.2f} lx".format(light))

# Publish the light level to the ThingSpeak channel
client.publish(topic, "field1=" + str(light))
This code will only publish values once and then stop. You can edit it yourself with the timing library to make it publish multiple times. Be careful not to flood the broker with messages.