
Refresher on bash with Orange Pi specifics
While working with a Linux based SBC it is good to know your way around the bash shell.
The command prompt can be customized to show different information or symbols, depending on the user's preferences and the shell configuration. To enter a command, the user can type it after the prompt symbol and press Enter. The shell will then execute the command and display the output or any errors.
pi@orangepi ~$This is a command prompt in a bash shell, which is a common way to interact with a Linux operating system. It shows the following information:
piis the username of the current user who is logged in.@is a separator that indicates the next part is the hostname of the computer.orangepiis the hostname of the computer, which is a unique name that identifies it on a network.~is a shorthand for the home directory of the current user, which is where their personal files and settings are stored. It is equivalent to/home/piin this case.$is a prompt symbol that indicates the shell is ready to accept commands from the user.
You can always check the above with the commands 'hostname' and 'pwd':
hostnameis a command that displays the host name portion of the full computer name of the computer.
pi@orangepi ~$ hostname
orangepi
pi@orangepi ~$pwdis a command that stands for print working directory. It prints the path of the current working directory, starting from the root. The current working directory is the directory in which the user is currently working in.
pi@orangepi ~$ pwd
/home/pi
pi@orangepi ~$
sudo (command): This will give you the ability to execute commands as the superuser, also known as the root user or the administrator. The superuser has the highest level of privileges on the system and can perform tasks that are restricted for other users. For example,sudo apt updatewill update the list of available packages from the repositories, which requires superuser permissions. When you use sudo, you will be prompted to enter your password for authentication.
pi@orangepi ~$ sudo apt update
[sudo] password for user:
Hit:1 http://archive.ubuntu.com/ubuntu focal InRelease
Get:2 http://archive.ubuntu.com/ubuntu focal-updates InRelease [114 kB]
...
sudo -i: This will set sudo interactive mode, which means you will be logged in as the root user and can run multiple commands without typing sudo each time. You will still need to enter your password to start the interactive mode. To exit the interactive mode, typeexitor press Ctrl+D. For example,sudo -iwill log you in as the root user and then you can run commands likeapt updateandapt upgradewithout sudo.
pi@orangepi ~$sudo -i
[sudo] password for user:
pi@orangepi:~# apt upgrade
Reading package lists... Done
Building dependency tree
Reading state information... Done
Calculating upgrade... Done
...
pi@orangepi:~# exit
logout
pi@orangepi ~$
Navigating the filesystem
Basic commands
- The
cdcommand stands for change directory. It allows you to navigate to a different directory in the file system. You can specify the path of the directory you want to go to as an argument. For example,cd /will take you to the root directory, which is the topmost level of the file system. You can also usecd ..to go up one level in the directory hierarchy, orcd ~to go to your home directory. Here is an example:
pi@orangepi:~$ cd / # change to the root directory
pi@orangepi:/$ cd home # change to the home directory
pi@orangepi:/home$ cd orangepi # change to the orangepi directory
pi@orangepi:~$ cd .. # go up one level
pi@orangepi:/home$ cd ~ # go back to the home directory
pi@orangepi:~$- The
lscommand stands for list. It displays the files and directories in the current directory. You can also specify a different directory as an argument to list its contents. For example,ls /will list the files and directories in the root directory. Thelscommand has many options that can modify its output, such as-lfor long format,-afor showing hidden files,-tfor sorting by modification time, and-Sfor sorting by size. Here is an example of using thelscommand with some options in a code block:
pi@orangepi:~$ ls -l / # list the files and directories in the root directory in long format
total 72
drwxr-xr-x   2 root root  4096 Apr  6 11:54 bin
drwxr-xr-x   3 root root  4096 Apr  6 11:54 boot
drwxr-xr-x  15 root root  3180 Apr  6 11:54 dev
drwxr-xr-x  95 root root  4096 Apr  6 11:54 etc
drwxr-xr-x   3 root root  4096 Apr  6 11:54 home
drwxr-xr-x  18 root root  4096 Apr  6 11:54 lib
drwx------   2 root root 16384 Apr  6 11:54 lost+found
drwxr-xr-x   2 root root  4096 Apr  6 11:54 media
drwxr-xr-x   2 root root  4096 Apr  6 11:54 mnt
drwxr-xr-x   3 root root  4096 Apr  6 11:54 opt
dr-xr-xr-x 108 root root     0 Apr  6 11:54 proc
drwx------   4 root root  4096 Apr  6 11:54 root
drwxr-xr-x  21 root root   660 Apr  6 11:54 run
drwxr-xr-x   2 root root  4096 Apr  6 11:54 sbin
drwxr-xr-x   2 root root  4096 Apr  6 11:54 srv
dr-xr-xr-x  12 root root     0 Apr  6 11:54 sys
drwxrwxrwt   9 root root  4096 Apr  6 11:54 tmp
drwxr-xr-x  10 root root  4096 Apr  6 11:54 usr
drwxr-xr-x  11 root root  4096 Apr  6 11:54 var
cp (source) (dest): This will copy the contents of the source file into a destination file. You can specify the path to the source and destination files as arguments, either as absolute paths or relative paths. For example,cp notes.txt backupwill create a copy ofnotes.txtin thebackupdirectory, while keeping the original file in the current directory.
pi@orangepi:~$ cp notes.txt backup # copy notes.txt to backup directory
pi@orangepi:~$ ls backup # list the contents of backup directory
notes.txt
mv (filename) (directory): This will move (essentially cut and paste) the file to the named directory. You can also use this command to rename a file by providing a new name as the destination. For example,mv report.pdf documentswill move the filereport.pdffrom the current directory to thedocumentsdirectory, and remove it from the current directory.
pi@orangepi:~$ mv report.pdf documents # move report.pdf to documents directory
pi@orangepi:~$ ls documents # list the contents of documents directory
report.pdf
rm (filename): This will remove the specified file. Be careful with this command, as there is no way to undo it. You can also use the-roption to remove a directory and its contents recursively. For example,rm old.txtwill delete the fileold.txtfrom the current directory.
pi@orangepi:~$ rm old.txt # remove old.txt file
pi@orangepi:~$ ls # list the contents of current directory
backup  documents  new.txt
touch (filename): This will create an empty file. You can also use this command to update the timestamp of an existing file. For example,touch new.txtwill create a file namednew.txtin the current directory, with no content and the current date and time as its timestamp.
pi@orangepi:~$ touch new.txt # create new.txt file
pi@orangepi:~$ ls -l new.txt # show the details of new.txt file
-rw-r--r-- 1 pi pi 0 Jan 15 10:26 new.txt
mkdir (directory): This will create a directory. You can use the-poption to create parent directories as needed. For example,mkdir projectswill create a directory namedprojectsin the current directory.mkdir -p projects/python/hellowill create the directoriesprojects,projects/python, andprojects/python/helloif they do not exist.
pi@orangepi:~$ mkdir projects # create projects directory
pi@orangepi:~$ ls # list the contents of current directory
backup  documents  new.txt  projects
pi@orangepi:~$ mkdir -p projects/python/hello # create projects/java/hello directory
pi@orangepi:~$ ls projects/python # list the contents of projects/java directory
hello
find / -name (filename): This will search your whole computer for a file. You can use wildcards to match patterns. For example,find / -name settings.txtwill look for a file namedsettings.txtin every directory and subdirectory starting from the root (/).find / -name "*.jpg"will find all files with the.jpgextension.
pi@orangepi:~$ find / -name settings.txt # search for resume.docx file
/home/pi/Documents/settings.txt
pi@orangepi:~$ find / -name "*.jpg" # search for jpg files
/home/pi/Pictures/wallpaper.jpg
/home/pi/Pictures/photo.jpg
man (command): This is the “manual.” This will show you detailed information about a specific command. You can use the arrow keys, the space bar, or the enter key to scroll through the manual page, and pressqto quit. You can also use the/key to search for a keyword within the manual page, and pressnto go to the next match, orNto go to the previous match. For example,man lswill show the manual page for thelscommand, which lists the contents of a directory.
pi@orangepi:~$ man ls # show the manual page for ls command
LS(1)                            User Commands                           LS(1)

NAME
       ls - list directory contents

SYNOPSIS
       ls [OPTION]... [FILE]...

DESCRIPTION
       List  information  about  the FILEs (the current directory by default).
       Sort entries alphabetically if none of -cftuvSUX nor --sort  is  speci‐
       fied.

       Mandatory  arguments  to  long  options are mandatory for short options
       too.

       -a, --all
              do not ignore entries starting with .
Common directories
Using the ls command reveals a lot of directories. An explanation of the most common ones:
/binis the main executables folder. It contains essential binary files that are needed for the basic functioning of the system, such asbash,ls,cp,mv, etc. These files are usually executable by all users and are invoked by the shell or other programs ./bootis the folder containing the pi boot config, FAT formatted partition can be edited on your PC. It contains the files that are required to boot the system, such as the kernel image, the bootloader, the device tree, and the initramfs. The boot config file (config.txt) can be used to customize various settings, such as the display resolution, the memory split, the overclocking, etc. The FAT formatted partition means that the files can be accessed by other operating systems, such as Windows, that can read the FAT file system ./devis the folder where the files in this folder are the devices in the system (unix sees everything as files in the system so /dev/eth0 is the ethernet port). It contains special files that represent the devices that are attached to the system, such as disks, terminals, printers, cameras, etc. These files can be used to communicate with the devices, either by reading from or writing to them. For example,/dev/eth0is the file that represents the first ethernet interface, and/dev/sdais the file that represents the first SATA disk ./etcis the folder that is usually used for system configuration files. You will need at some time to edit files in here. It contains various files that store the settings and preferences for the system and the applications that run on it. For example,/etc/passwdis the file that stores the user accounts and their information,/etc/fstabis the file that stores the mount points and options for the file systems,/etc/hostnameis the file that stores the name of the system, etc. These files can be edited by the system administrator to change the behavior of the system or the applications ./homeis the folder that is usually used for the users on your Pi's home directories. When you login as orangepi you are put into the /home/orangepi folder which you can use to put your files. It contains the subdirectories that belong to each user that has an account on the system. These subdirectories are also called the home directories of the users, and they store their personal files, settings, and preferences. For example,/home/orangepiis the home directory of the user orangepi, and/home/piis the home directory of the user pi. The users can create, modify, and delete files in their own home directories, but they may not have access to other users' home directories, depending on the permissions ./libis the folder that is usually used for system library files so is a bit like the c:\windows\system32 folder on your PC. It contains the shared library files that are needed by the binary files in/binand/sbinto run. These library files provide common functions and features that are used by many programs, such as input/output, memory management, network communication, etc. For example,/lib/libc.sois the file that contains the standard C library, which is used by almost every program on the system ./mediaand/mntare the folders that are used for mounting storage devices. They are used to attach the file systems that are located on external devices, such as USB drives, CD-ROMs, network shares, etc., to the directory hierarchy of the system. For example,/media/pi/USBcould be the mount point for a USB drive that belongs to the user pi, and/mnt/nascould be the mount point for a network-attached storage device. The difference between/mediaand/mntis that/mediais usually used for temporary or removable devices that are mounted automatically by the system, while/mntis usually used for permanent or fixed devices that are mounted manually by the user ./optis the folder that is usually used for optional programs. It contains the subdirectories that store the files and directories of the applications that are not part of the standard distribution of the system, but are installed by the user or a third-party vendor. These applications are usually self-contained and do not interfere with the rest of the system. For example,/opt/firefoxcould be the subdirectory that contains the files and directories of the Firefox web browser, and/opt/minecraftcould be the subdirectory that contains the files and directories of the Minecraft game ./procis the folder that usually shows information about processes, is a pseudo-filesystem. It contains the special files that provide information about the processes that are running on the system, as well as other system information, such as the CPU, the memory, the devices, etc. These files are not stored on the disk, but are generated dynamically by the kernel when they are accessed. For example,/proc/1is the file that provides information about the process with the ID 1, which is usually the init process, and/proc/cpuinfois the file that provides information about the CPU of the system ./rootis the home folder of the root user. It is where the system administrator can store their personal files and settings, as well as perform administrative tasks that require root privileges. The root user is the superuser that has full access and control over the system, and can perform any operation on any file or directory. The root user should be used with caution, as it can cause damage or instability to the system if used incorrectly ./sbinis the folder where the system maintenance and/or administrative task programs are found. It contains the binary files that are used for system administration and maintenance, such asfdisk,ifconfig,mount,reboot, etc. These files are usually executable only by the root user or the users with sudo privileges, as they can affect the whole system or other users' files and directories ./tmpis the folder for temporary files, you can use it but the files in it are deleted on system boot. It contains the files that are created and used by the programs that run on the system, but are not needed after the programs terminate. These files can be used for storing intermediate results, caching data, logging messages, etc. The files in/tmpare accessible by all users, but they are not persistent, as they are deleted when the system is rebooted or when the files are not accessed for a certain period of time ./usris the folder for user installed programs - quite often system shell programs are written and put in /usr/local/bin. It contains the subdirectories that store the files and directories of the applications that are installed by the user or the package manager, and are not essential for the basic functioning of the system. These applications are usually shared and used by multiple users, and do not require root privileges to run. For example,/usr/bincontains the binary files of the user applications, such aspython,gcc,nano, etc.,/usr/libcontains the library files of the user applications, such as/usr/lib/python3.7,/usr/lib/gcc, etc., and/usr/sharecontains the shared data of the user applications, such as/usr/share/doc,/usr/share/icons, etc. The/usr/localsubdirectory is used for the applications that are installed locally by the user, and are not managed by the package manager. For example,/usr/local/bincontains the binary files of the local applications, such aspip,git,node, etc ./varis the folder where variable data in the system is stored - such as logs/mail etc. It contains the subdirectories that store the files and directories that change frequently or dynamically, such as logs, caches, spools, databases, etc. These files are used to store the information that is generated or modified by the system or the applications that run on it. For example,/var/logcontains the log files of the system and the applications, such as/var/log/syslog,/var/log/apache2, etc.,/var/cachecontains the cache files of the applications, such as/var/cache/apt,/var/cache/fontconfig, etc., and/var/mailcontains the mail files of the users, such as/var/mail/orangepi,/var/mail/pi, etc .
Checking permissions
When you list the files and directories in the current directory in a long format, it also shows the permissions and other information of each file and directory. For example, ls -l will show something like this:
pi@orangepi:~$ ls -l
total 32
drwxr-xr-x 2 pi pi 4096 Nov  2 10:23 backup
drwxr-xr-x 3 pi pi 4096 Nov  2 10:23 documents
-rw-r--r-- 1 pi pi    0 Jan 15 10:26 new.txt
drwxr-xr-x 3 pi pi 4096 Nov  2 10:23 projects
The first column shows the permissions of each file and directory. The permissions are composed of 10 characters, which can be divided into four parts:
The first character indicates the type of the file or directory. It can be one of the following:
-: regular filed: directoryl: symbolic linkc: character deviceb: block devicep: named pipes: socket?: unknown type
The next three characters indicate the permissions for the owner (user) of the file or directory. They can be one of the following:
r: read permission, which means the owner can read the contents of the file or list the contents of the directory.w: write permission, which means the owner can modify the file or create, delete, or rename files in the directory.x: execute permission, which means the owner can execute the file or enter the directory.-: no permission, which means the owner cannot perform the corresponding action.
The next three characters indicate the permissions for the group of the file or directory. They have the same meaning as the permissions for the owner, but they apply to the members of the group that has been assigned to the file or directory.
The last three characters indicate the permissions for the others, which means anyone else who is not the owner or a member of the group. They have the same meaning as the permissions for the owner and the group, but they apply to all other users on the system.
For example, the permissions -rw-r--r-- mean that the file is a regular file, the owner can read and write it, the group can only read it, and the others can only read it. The permissions drwxr-xr-x mean that the file is a directory, the owner can read, write, and execute it, the group can only read and execute it, and the others can only read and execute it.
The other columns (
1 pi pi 0 Jan 15 10:26 new.txt) show the following information:- The number of hard links to the file or directory.
- The name of the owner of the file or directory.
- The name of the group of the file or directory.
- The size of the file or directory in bytes.
- The date and time of the last modification of the file or directory.
- The name of the file or directory.
Changing permissions
chmod : This command changes the permissions of files and directories. You can use different ways to specify the new permissions, such as numeric mode, symbolic mode, or reference mode. For example:
pi@orangepi:~$ chmod u+x file # will give the user (owner) execute permission on the file
pi@orangepi:~$ chmod 755 dir # will give the user read, write, and execute permissions, and the group and others read and execute permissions on the directory
pi@orangepi:~$ chmod u=rwx,g=rx,o=rx file # will do the same as chmod 755 file
The numeric mode uses three digits to represent the permissions for the user, the group, and the others. Each digit is the sum of the values for each permission:
- `4` : read permission
- `2` : write permission
- `1` : execute permission
- `0` : no permission
For example, 7 means read, write, and execute permissions, 6 means read and write permissions, 5 means read and execute permissions, 4 means read permission, 3 means write and execute permissions, 2 means write permission, 1 means execute permission, and 0 means no permission.
The symbolic mode uses symbols to represent the permissions for the user (u), the group (g), the others (o), or all of them (a).
You can use the following operators to change the permissions:
+: add the specified permissions to the existing permissions-: remove the specified permissions from the existing permissions=: set the specified permissions and clear the others
You can use the following symbols to represent the permissions:
r: read permissionw: write permissionx: execute permission
So, for example:
u+xmeans add execute permission for the userg-wmeans remove write permission for the groupo=rmeans set read permission and clear the others for the others
Here are some more examples of how to use the chmod command:
- To give read and write permissions to the user and the group, and no permissions to the others, on a file named
secret.txt, you would use one of the two commands:
pi@orangepi:~$ chmod 660 secret.txt
pi@orangepi:~$ chmod u=rw,g=rw,o= secret.txt- To give execute permission to everyone on a file named
script.sh, you would use one of the two commands:
pi@orangepi:~$ chmod a+x script.sh
pi@orangepi:~$ chmod 755 script.sh- To remove all permissions from a file named
junk.txt, you would use one of the two commands:
pi@orangepi:~$ chmod 000 junk.txt
pi@orangepi:~$ chmod a= junk.txt- To copy the permissions of a file named
example.txtto a file namedtest.txt, you would use one of the two commands:
pi@orangepi:~$ chmod --reference=example.txt test.txtIP addressing commands
ip addris a command that shows the IP address details of the interface of your pi. It can also be used to add, delete, or modify the IP addresses of the interfaces. For example,ip addr show eth0will display the IP address of the ethernet interface, andip addr add 192.168.1.100/24 dev eth0will assign a static IP address of 192.168.1.100 to the ethernet interface.
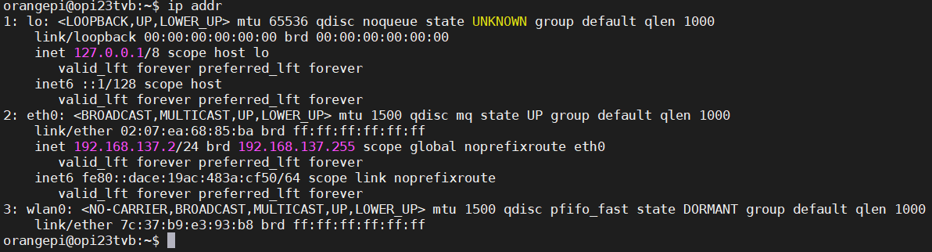
ip routeis a command that shows the system routing table. It can also be used to add, delete, or modify the routes of the system. For example,ip route showwill display the current routes, andip route add default via 192.168.1.1 dev eth0will add a default gateway of 192.168.1.1 to the ethernet interface.

moreornanoare commands that allow you to read a text file.moreis a simple pager that displays the contents of a file one screen at a time, and allows you to scroll down or search for a pattern.nanois a text editor that allows you to view and edit the contents of a file, and provides some basic features such as cut, paste, undo, search, and replace. For example,more /etc/resolv.confwill display the contents of the/etc/resolv.conffile, which is your host file that stores the DNS server addresses.nano /etc/resolv.confwill open the same file in the nano editor, where you can make changes and save them. Here is an example of the output ofmore /etc/resolv.conf:
# Generated by NetworkManager
nameserver 8.8.8.8
nameserver 8.8.4.4
Monitoring the system
dateis a command that displays the current date and time of the system. It can also be used to set the system date and time, or to format the output in different ways. For example,date +"%A, %B %d, %Y"will display the date asTuesday, March 5, 2024:
pi@orangepi:~$ date +"%A, %B %d, %Y"
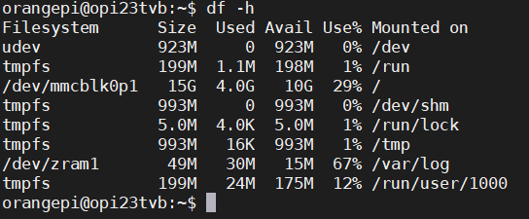
Tuesday, March 5, 2024df -his a command that reports how much free disk space is available on the file systems. The-hoption makes the output human-readable, by using units such as K, M, G, etc. For example,df -h /will display the disk usage of the root file system. Here is an example of the output ofdf -h /:
Sure, I can talk more about these commands and give you some examples. 😊
free -mis a command that displays the total amount of free and used physical and swap memory in the system, as well as the buffers and caches used by the kernel, in megabytes. The information is gathered by parsing/proc/meminfo. For example,free -mwill show something like this:
pi@orangepi:~$ free -m
              total        used        free      shared  buff/cache   available
Mem:           1987         654         320          13        1012        1158
Swap:          1535         119        1416
pstree -Gis a command that shows the running processes as a tree, which is a more convenient way to display the processes hierarchy and makes the output more visually appealing. The root of the tree is eitherinitor the process with the given pid. For example,pstree -Gwill show something like this:
pi@orangepi:~$ pstree -G
systemd─┬─VBoxService───7*[{VBoxService}]
        ├─accounts-daemon───2*[{accounts-daemon}]
        ├─2*[agetty]
        ├─atd
        ├─cron
        ├─dbus-daemon
        ├─irqbalance───{irqbalance}
        ├─2*[iscsid]
        ├─lvmetad
        ├─lxcfs───2*[{lxcfs}]
        ├─networkd-dispat───{networkd-dispat}
        ├─nginx───2*[nginx]
        ...
sudo killall <name of process>is a command that kills all processes that match the name specified. Without additional arguments,killallsendsSIGTERM, or signal number 15, which terminates running processes that match the name specified. For example,sudo killall sshdwill kill all processes namedsshd.
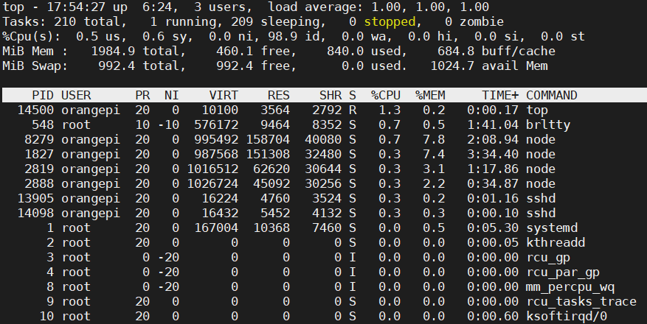
$ sudo killall sshdtopis basically the task manager for Linux. It provides an ongoing look at processor activity in real time. It can sort the tasks by CPU usage, memory usage and runtime.
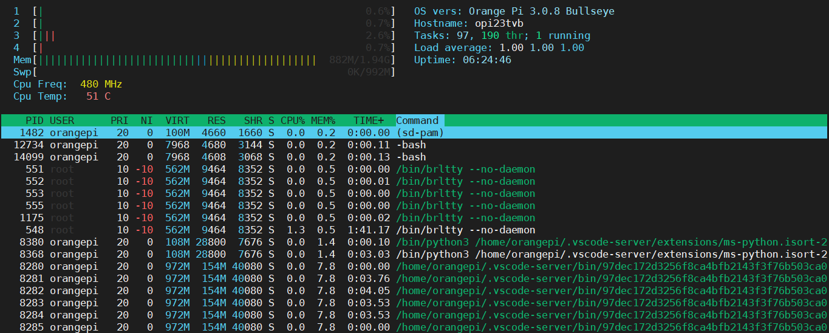
htopis similar totopbut improved with graphs and color
dmesgshows the kernel logs since boot time.

You can specify this further, for example dmesg | grep usb just shows logs involving USB devices.

Installing packages
apt-get is a command-line tool that is used to manage packages on Debian-based systems, such as Ubuntu. It can install, remove, update, and upgrade packages from the repositories that are specified in the /etc/apt/sources.list file and the files in the /etc/apt/sources.list.d directory.
The options for this are:
install: to install packages and dependencies. For example,apt-get install geditwill install thegeditpackage.remove: to remove packages and configuration files. For example,apt-get remove geditwill remove thegeditpackage.update: to update the list of available packages from the repositories. For example,apt-get updatewill refresh the package list.upgrade: to upgrade all the installed packages and OS to the latest versions. This usually takes about 20 minutes!
wget is a command-line tool that can download files from the web using various protocols, such as HTTP, HTTPS, FTP, and FTPS. It can also resume interrupted downloads, mirror websites, and use wildcards and filters. Wget is available for Linux, macOS, and Windows systems.
Some examples of wget usage are:
To download a single file from a URL, use:
wget http://example.com/file.zipTo download a file and save it with a different name, use the
-Ooption:wget -O new.zip http://example.com/file.zipTo download multiple files from a list of URLs in a text file, use the
-ioption:wget -i urls.txtTo download a file in the background, use the
-boption:wget -b http://example.com/file.zip
Changing hostname and password
The system hostname is a name that is assigned to your device, it is used to identify your device on a network. It also can be appended to a domain.
If you want to ever change the system hostname again via bash, you will need to edit the file /etc/hostname as root. There will be just one line of code with the hostname.
So if you were to change by your own hostname to for example opi3:
pi@orangepi:~$ sudo nano /etc/hostnamewhich should look like the entry below
orangepiand change it to opi3
Once you change the hostname you will run into a problem where every time you run a command with sudo you will get the error unable to resolve host “your hostname here” it means that the hostname does not match the IP of your PI.
You will need to edit the file /etc/hosts by executing the following command and changing the old hostname to your new hostname opi3.
pi@orangepi:~$ sudo nano /etc/hosts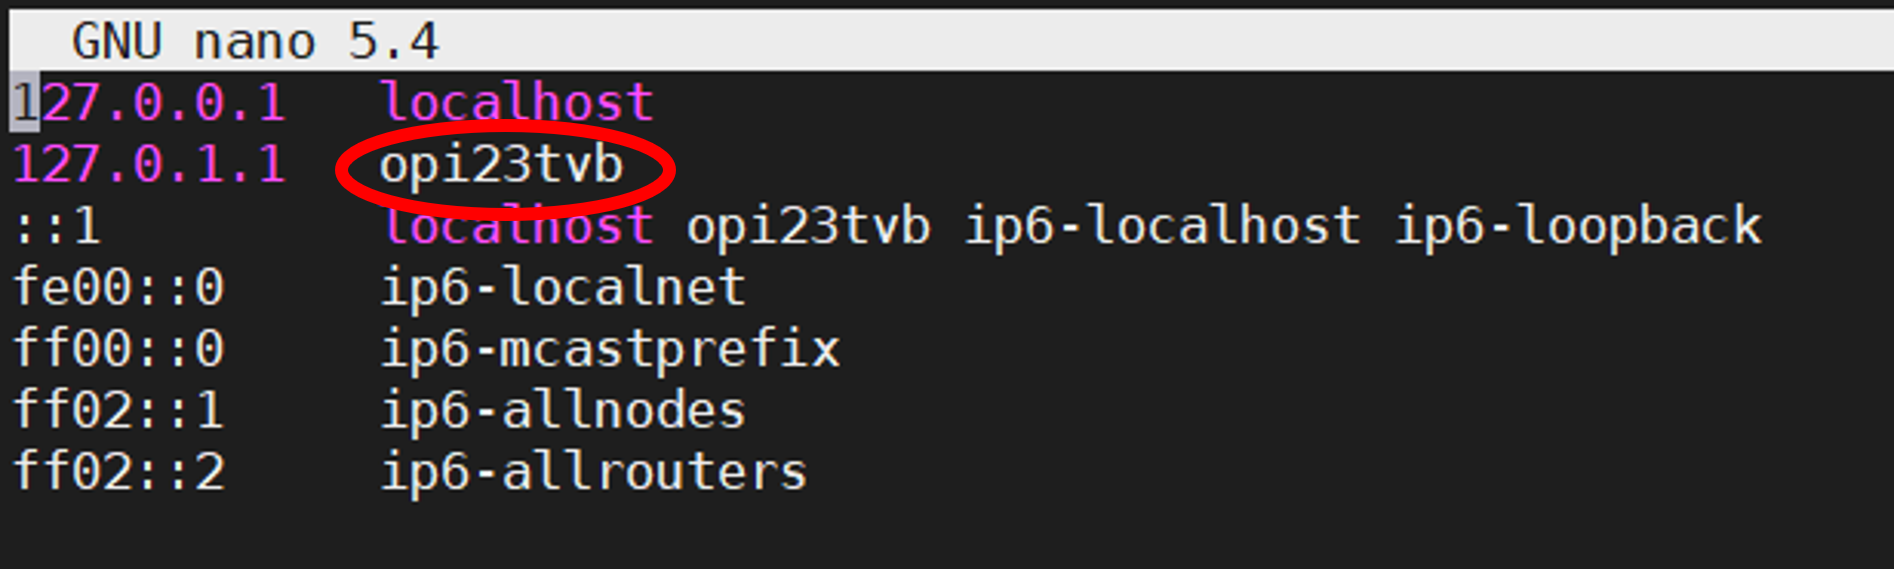
To then make the hostname active you must reboot the system
pi@orangepi:~$ sudo rebootOnce the Pi has booted up and when you have logged back in, your prompt will have changed to
pi@opi3:~$You can also change the password for the current user, to do this:
- Login to your Pi
- Once you are logged into your Pi type the following command
orangepi@orangepi:~# passwdThis command will prompt you to enter your current password and then a new password. You will need to confirm the new password by typing it again. This will change your password for the orangepi user account.
- Type the following command to shut down the system and save the changes.
orangepi@orangepi:~# sudo shutdown -h nowThis command will use the sudo privilege to execute the shutdown command with the -h option, which means halt the system, and the now argument, which means do it immediately. This will power off your Pi safely.
Coding and running Python code on the Pi
In this section we will learn how to create a Python Hello-world program on our Pi:
# Hello world
print("Hello world!")
However, there are some challenges that we need to overcome. Our screen and keyboard are connected to our laptop, not the Pi. Our code has to run on the Pi, but our development environment also runs on our laptop.
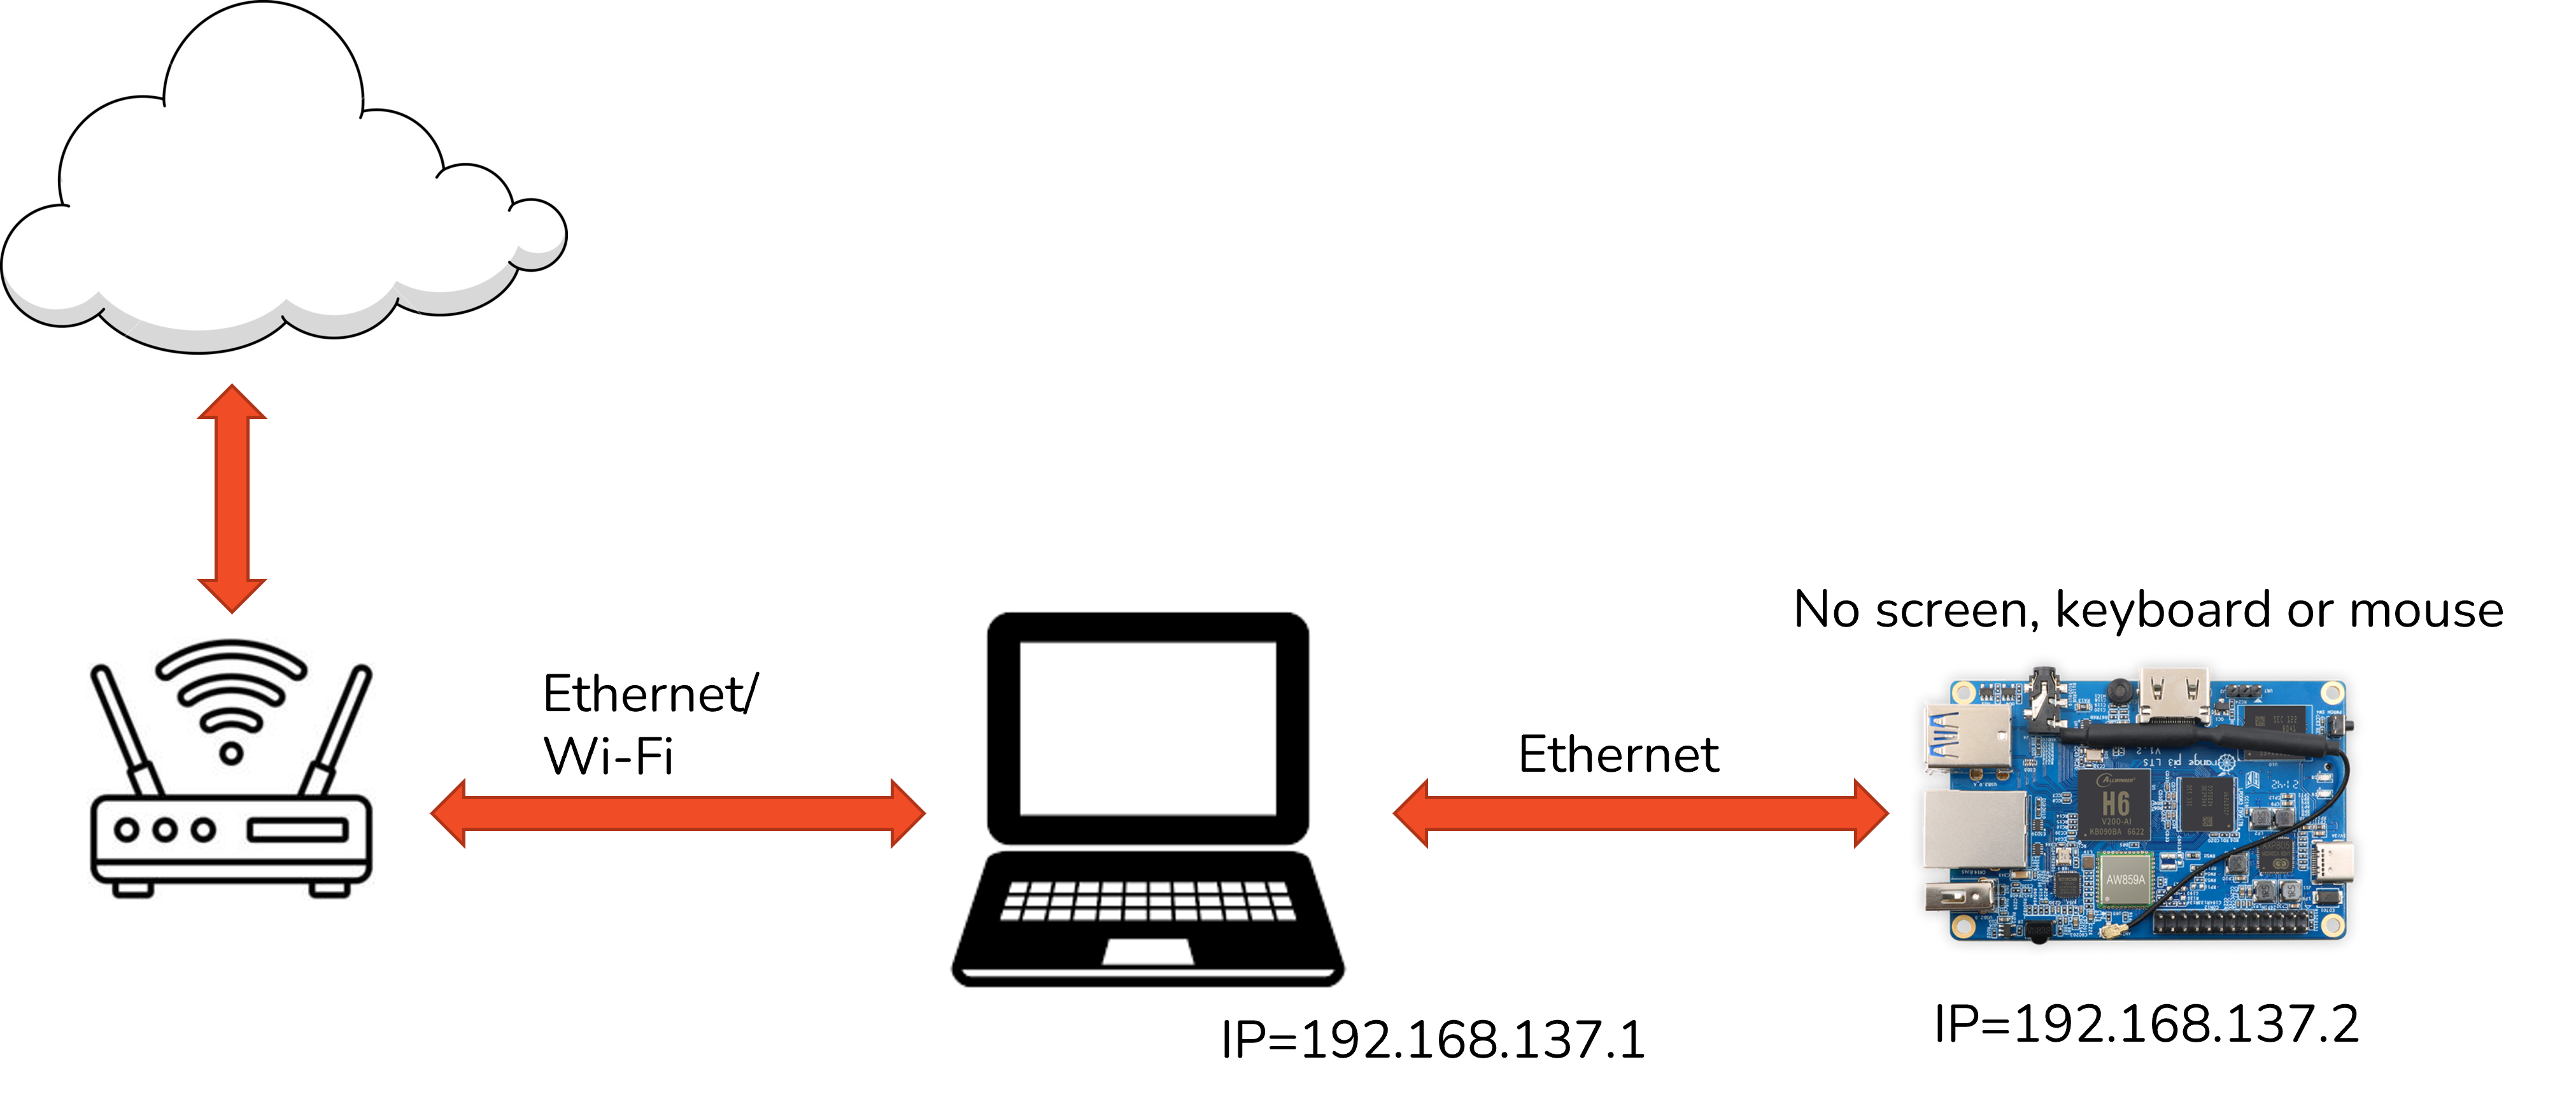
This is called a headless setup, meaning that we can control the Pi without a monitor, keyboard, or mouse directly connected to it.
We will look at three ways steps to code and get our code on the Pi to run:
- Do the upload manually, by copying the code from our laptop to the Pi using WinSCP and then using SSH to run the code.
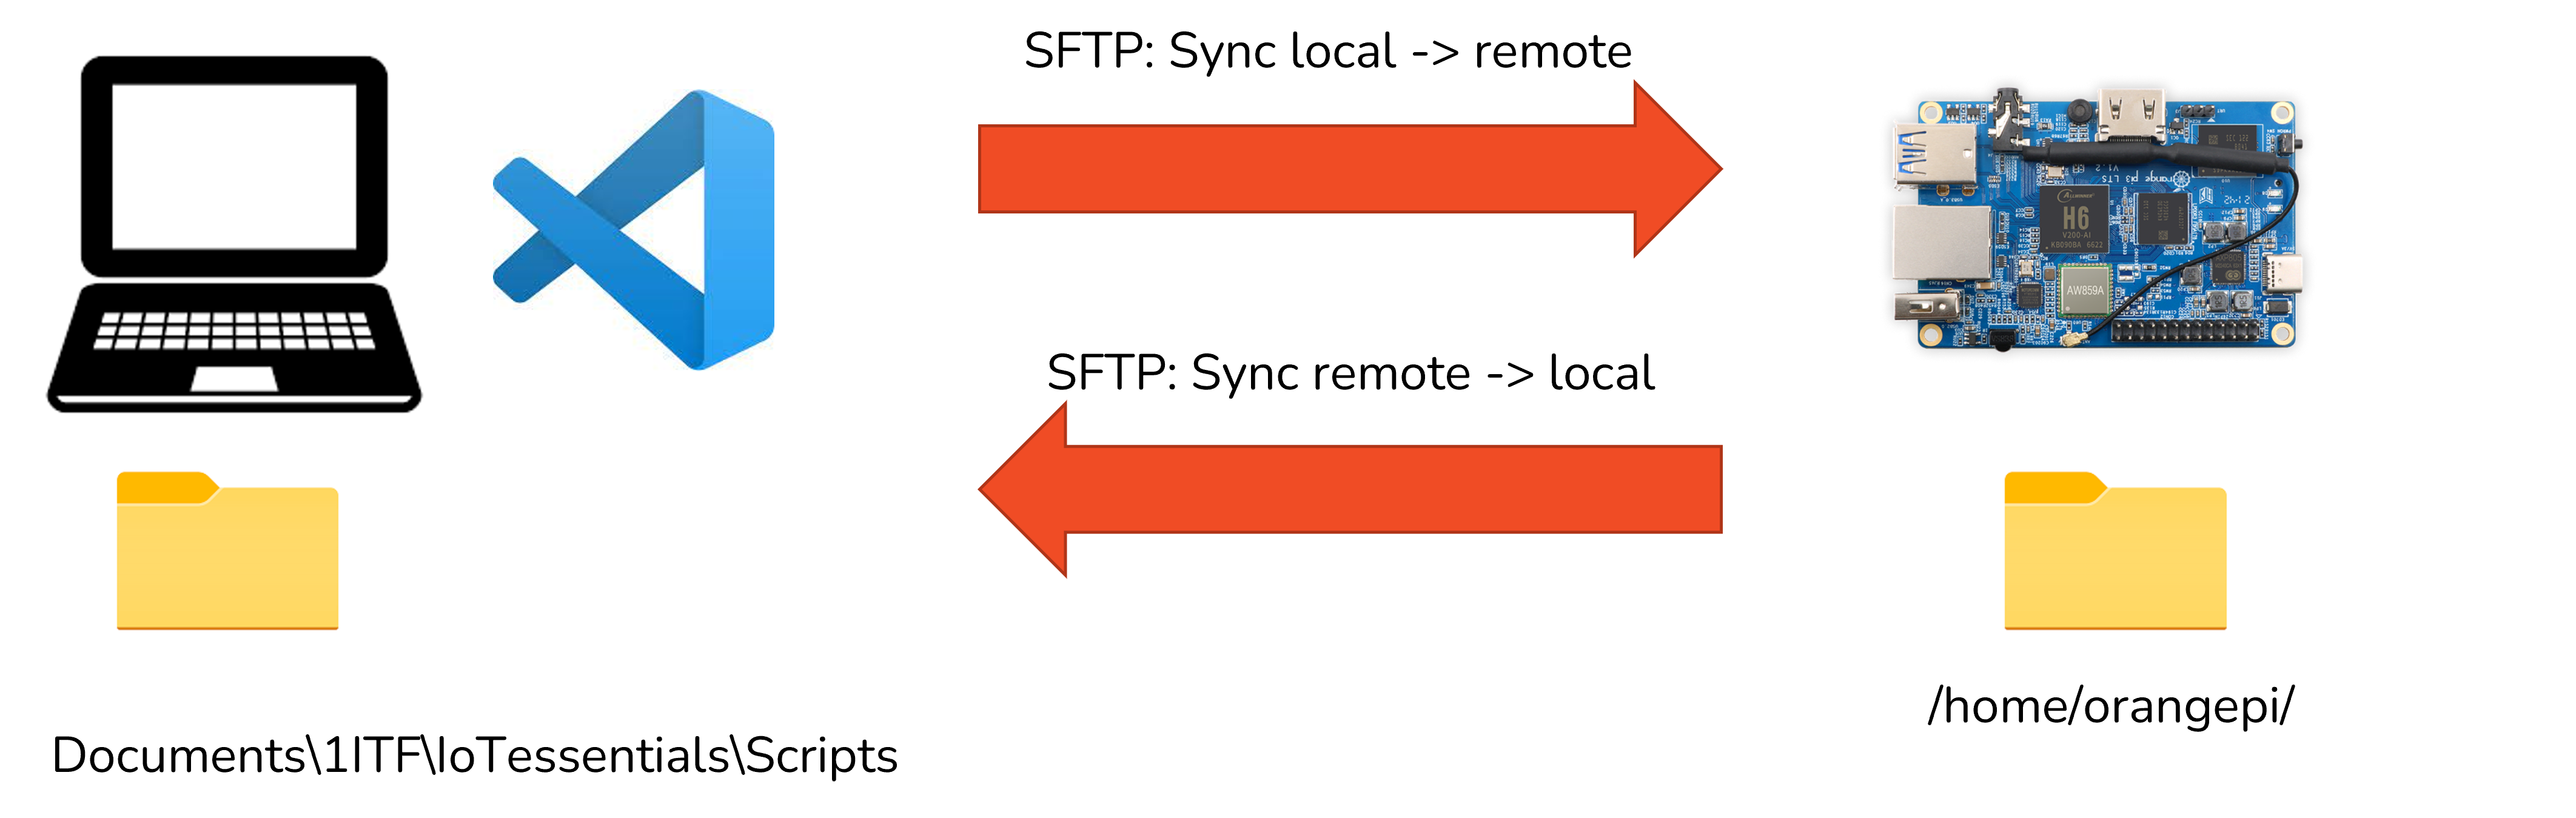
- Setup an automated pipeline, by using VSCode to open a local directory that you wish to sync between our laptop and the Pi whenever we make changes.
- Work remotely on the Pi, by using either Vscode or VNC to access the Pi's desktop and terminal from our laptop. This way, we can edit, run, and debug the code on the Pi as if we were using it directly.
After this we will also look at some ways to backup your code.
Manually uploading Python code and running it via SSH
The advantages and disadvantages of this are:
- ✅ It works with any editor or IDE
- ✅ You have total control over the workflow
- ❌ You have to re-upload after every code change
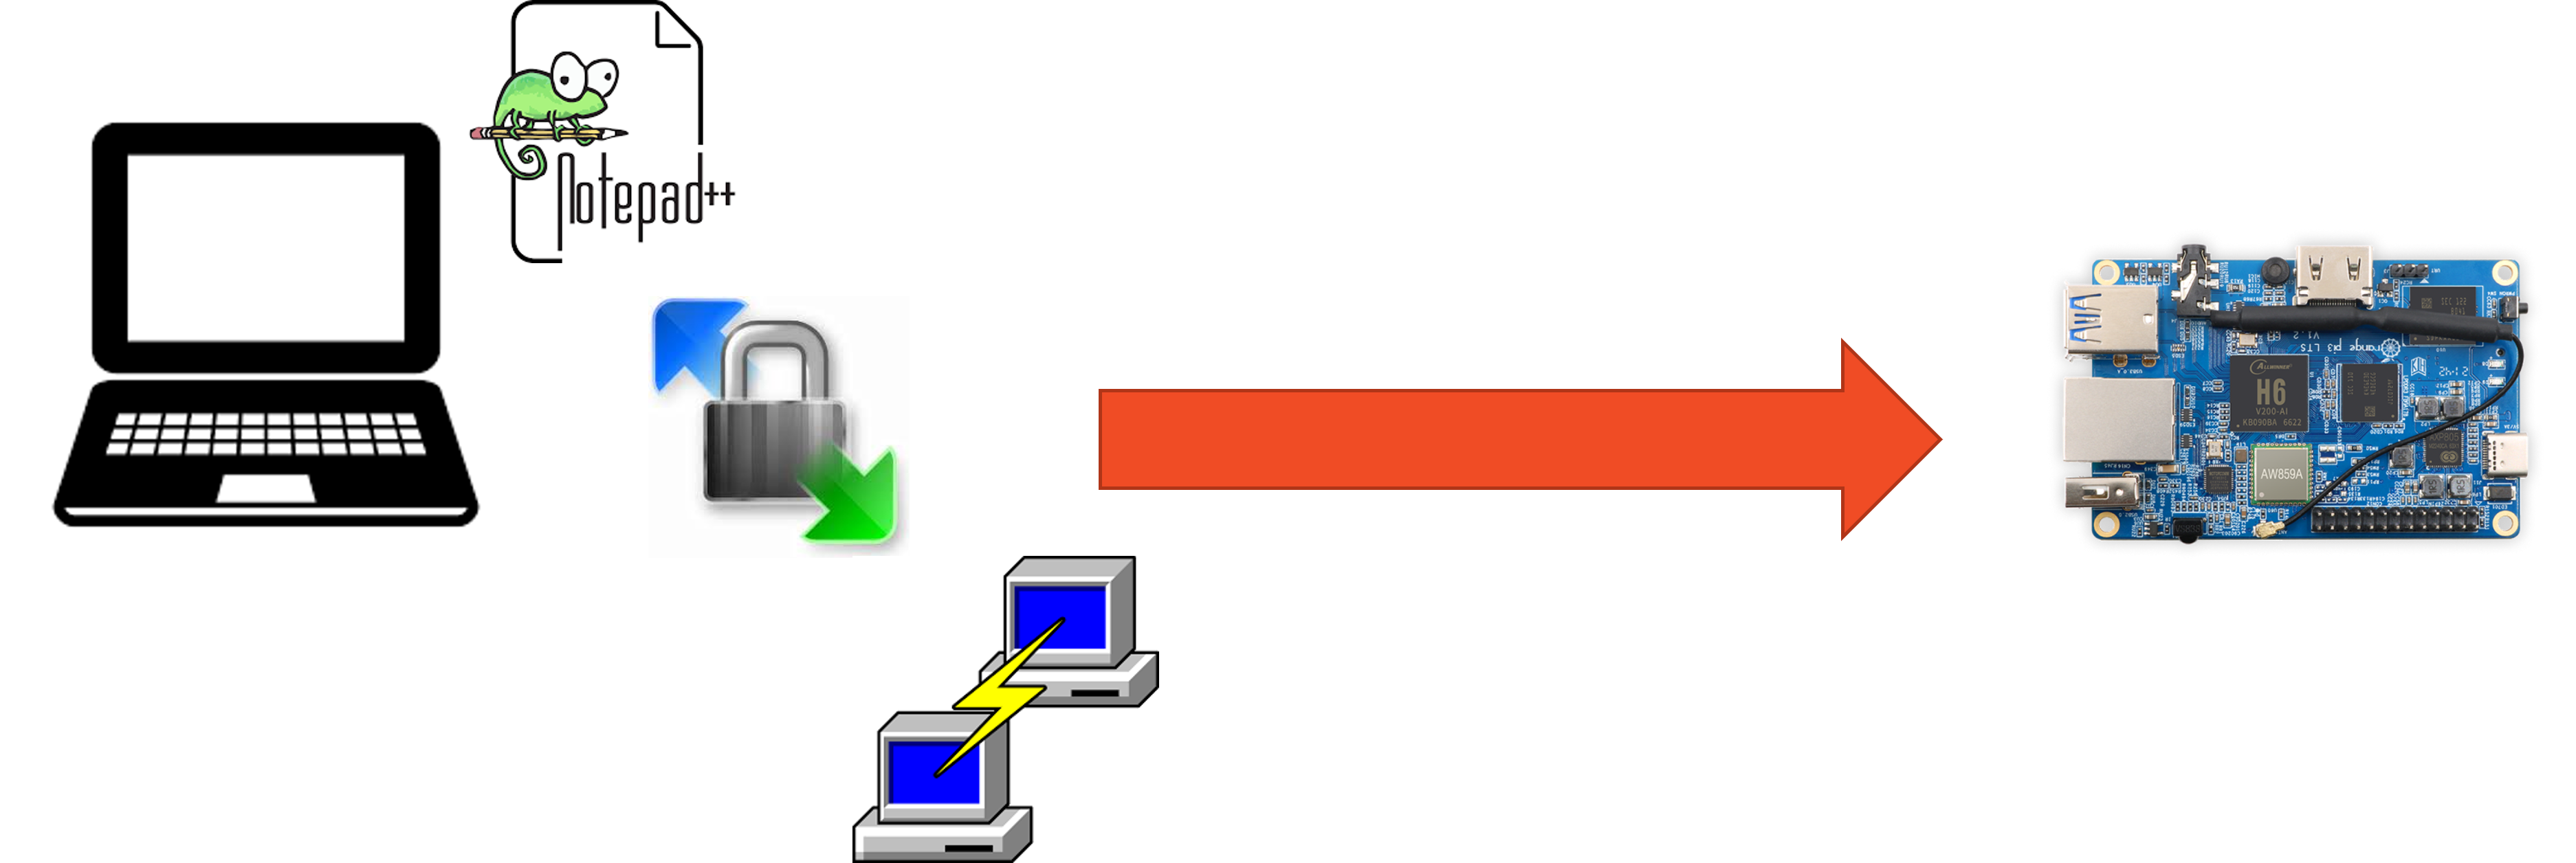
In this way of working we will:
- Program everything on your laptop
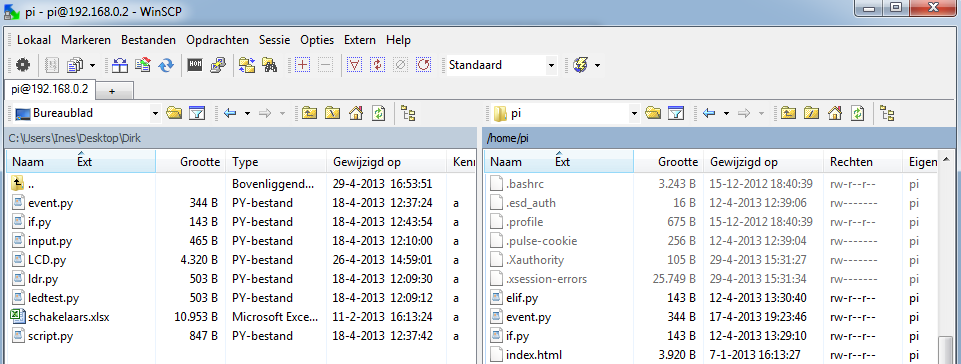
- Use WinSCP to copy the files to the OPI (drag-and-drop) with the SFTP protocol
- Use SSH to run the program code once it is on the Pi
Coding a basic Python file can be done in any IDE or editor. If you were to do it in Notepad++ you need to make sure to use the Unix format:
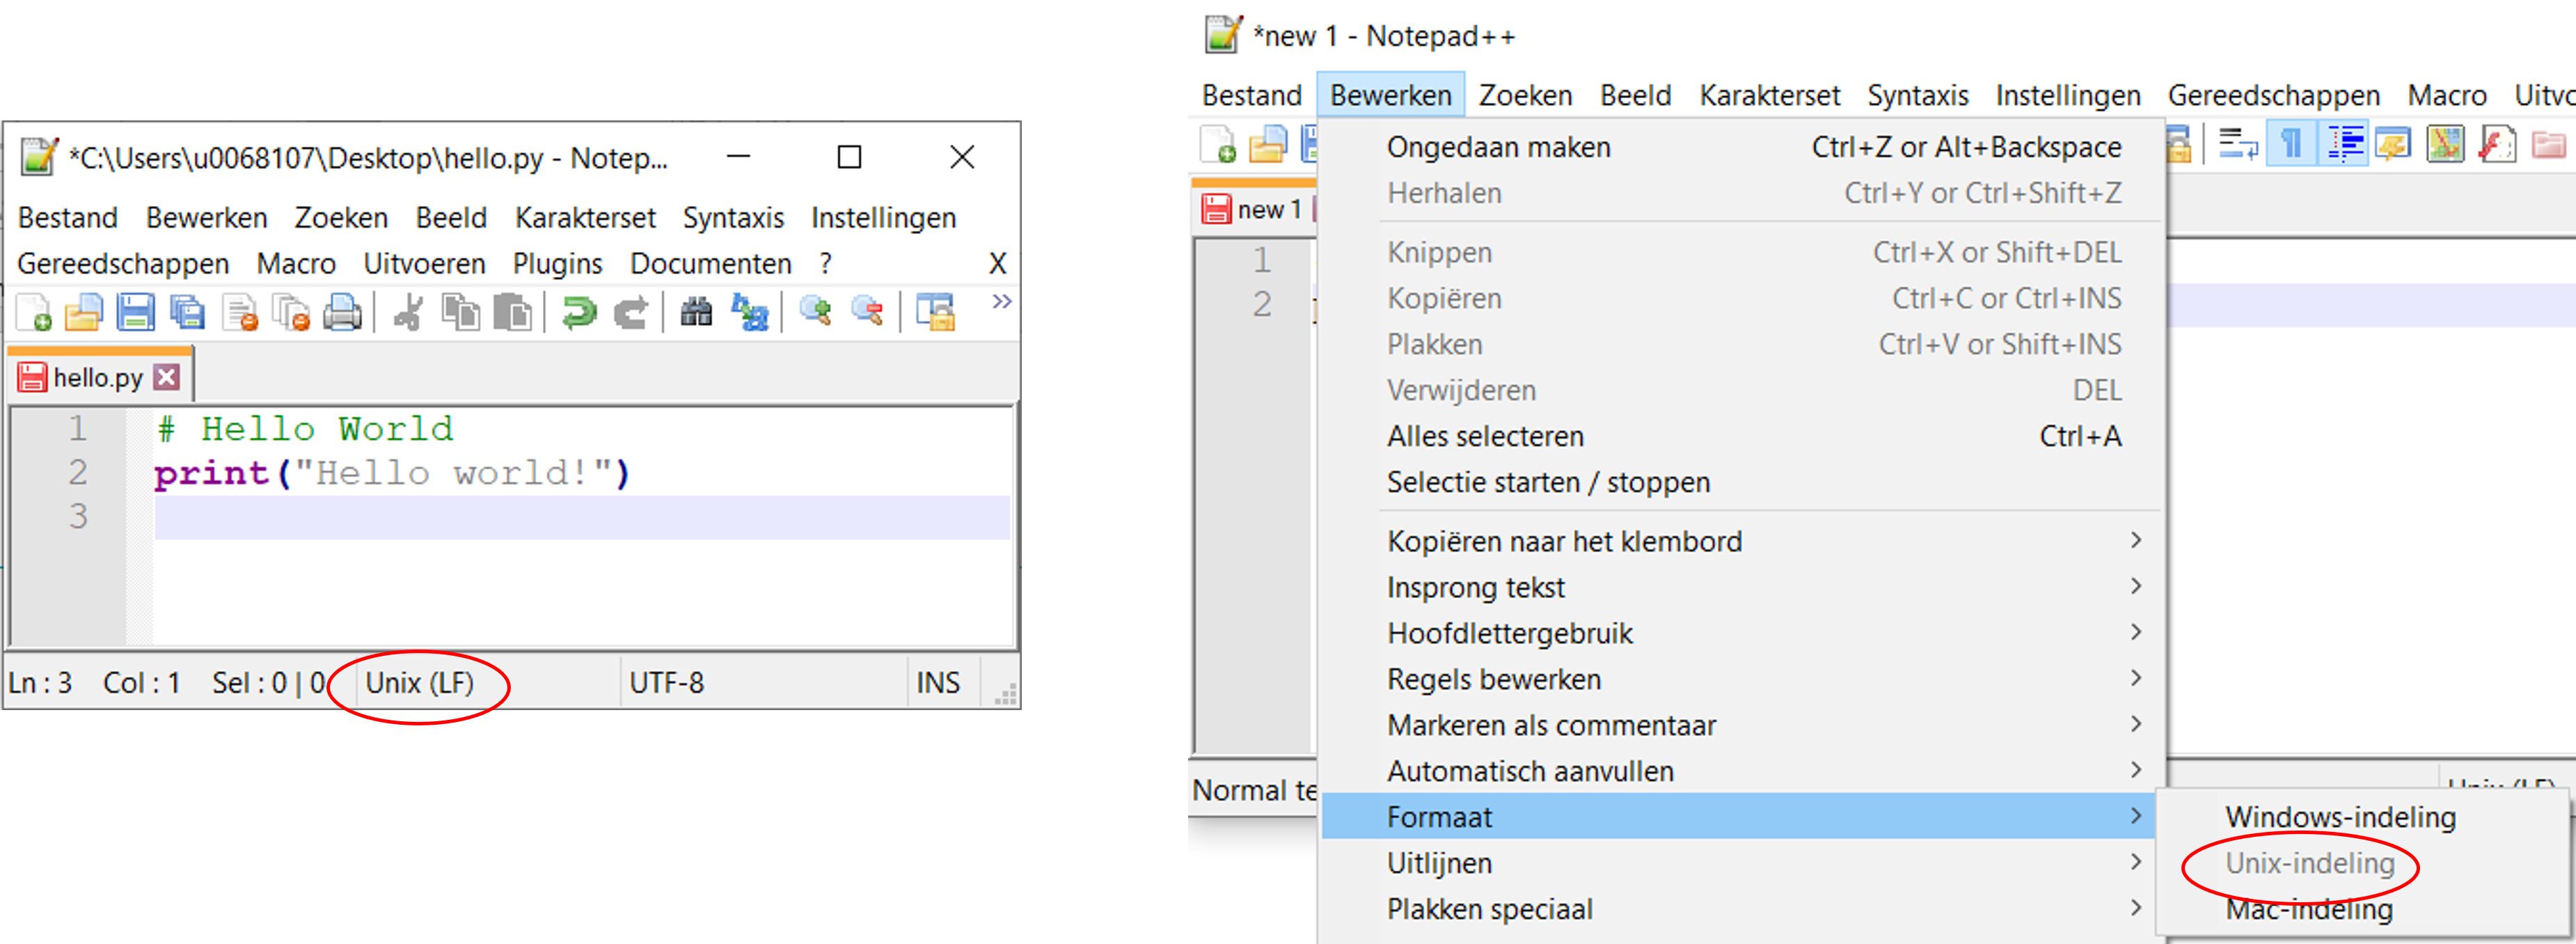
After saving the file locally on your laptop, the next step is to transfer it to the Pi. For this we will use WINSCP, download and install it on your laptop.
Using WINSCP you need to log in to the Pi with the correct credentials. Use the IP and the SSH port 22 of the Pi as we are using the SFTP protocol.
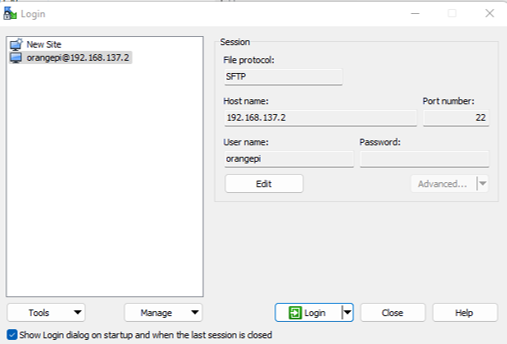
TIP
SFTP stands for SSH File Transfer Protocol. It is a network protocol that provides file access, file transfer, and file management over any reliable data stream. It is often used as a subsystem of SSH protocol version 2, which provides secure communication between computers. SFTP is more secure and versatile than FTP, which is an older protocol for file transfer. SFTP can also resume interrupted transfers, support all UNIX file types, and perform remote file removal.
Transfer the source file hello.py file from your local directory to the PI directory /home/orangepi.
All that is left now is to for example use PuTTY to enter the command to run the Python file. Be sure to move to the correct directory when doing this.
pi@orangepi:~$ sudo python3 hello.py
hello world
Automated sync with VSCode for a directory with Python code
The advantages and disadvantages of this are:
- ✅ Automatic saving
- ✅ Automatic backup (files stored locally and remote)
- ❌ You still need run the code via an SSH tool, such as PuTTY or via
ssh pi@192.168.0.xin PowerShell
In this way of working we will:
- Install VSCode and use it to code a Python file
- Install an SFTP VSCode extension and use it to automatically sync
- Use SSH to run the program code once it is on the Pi
First off download and install VSCode. After installing, use it to open a folder where you will be saving your Python file(s) and code the file. Upon saving, VSCode may ask you to install the python-plugins. Do so.
# Hello world
print("Hello world!")
Go to the "Extensions" tab on the left ribbon and search for the SFTP extension.

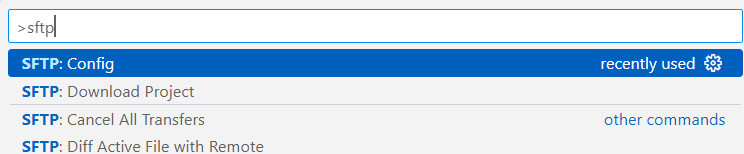
After installing open the VSCode command palette (Ctrl + Shift + p ) and type SFTP. Select SFTP: Config
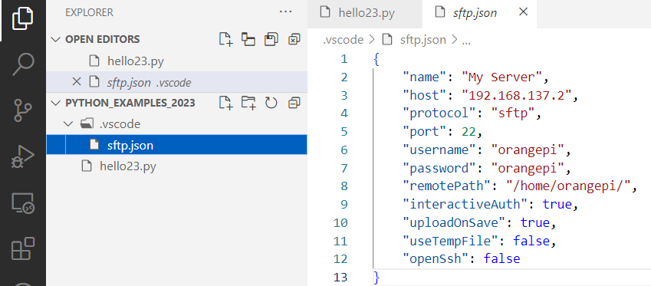
This will generate a configuration file in a hidden .vscode-folder. Edit the settings in this file for your own Pi setup. You can leave the password out to be safer, but this will mean that you have to type it every time when saving.
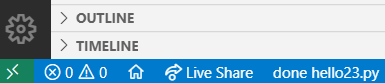
After setting this up you can save the Python file again and notice the successful upload in the bottom of VSCode.
You can also optionally right-click in the coding pane and select upload file (to Pi) or download file (from Pi).
Working remotely on the Pi using VSCode
The advantages and disadvantages of this are:
- ✅ Really fluent workflow, once set up there is not much more work to it
- ✅ No errors when using libraries that aren’t installed on your laptop (like when using GPIO or other Pi specific libraries)
- ✅ Debugging is possible (breakpoints, stepping through code, variable monitoring)
- ❌ The only copy of your scripts is on the Pi, so be sure to back them up
TIP
You can also do this using PyCharm
In this way of working we will:
- Install VSCode and install the VSCode Remote Extensionpack
- Setup the SSH configuration to connect to our Pi host
- Open folders on the Pi, code the Python file directly on the Pi and run it with the Pi bash
First off download and install VSCode.
After that go to the "Extensions" tab on the left ribbon and search for the Remote - SSH extension.

After installing, click the green arrow button on the bottom left of VSCode.
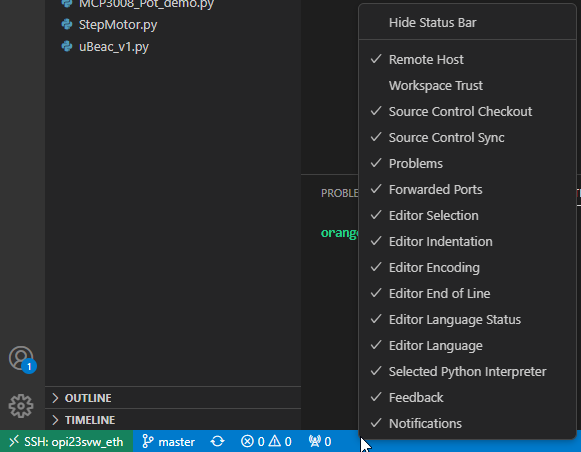
If the green arrow Remote SSH icon is missing:
Right click the activity bar and activate Remote Host
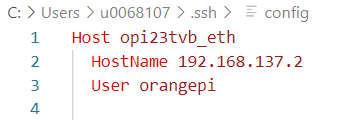
In the menu that opens, choose Open SSH configuration file. Here you need to add the IP or hostname of your Pi and the username your are using on your Pi (in lowercase!). If there is an error about the fingerprint having changed you also need to also remove the old host in C:/Users/your_user/.ssh/known_hosts file.
After doing that:
- Click the green arrow-button on the bottom left again
- In the menu that opens choose “Connect to Host…”. A new window opens.
- Choose “Linux” in the menu that opens
- Accept the fingerprint
- Enter your password
- Wait. It takes a long while the first time, but is a lot faster after that.
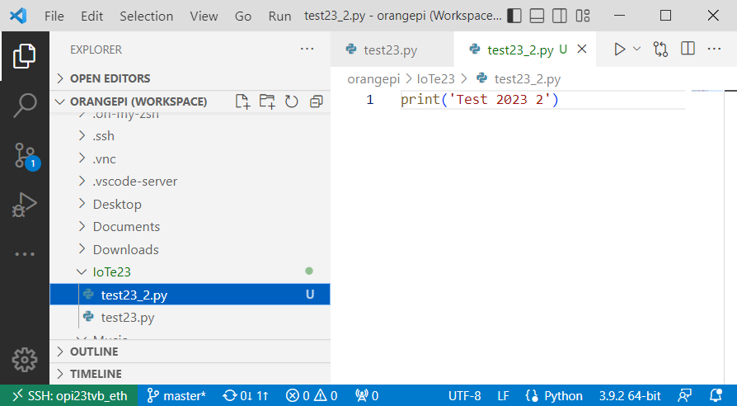
After this your VSCode enviroment should be connected to your Pi and you should now be able to see the Pi bash and open a folder:
- Click the top Explorer 📄 tab icon on the left ribbon
- Click Open Folder
- Enter your password again

Note how you see the folders in your home-drive on the Pi. Now you can create a folder for files, create files and run them right on the Pi via bash. The extensions you have installed in VSCode on your laptop aren’t installed here so install the Python extension again to run Python files from VSCode.
To start developing again after you closed VSCode:
- Click the green button
- Choose the right host
- Enter your password
- Open the folder
- Enter your password again
TIP
If you want to avoid having to type your password every time you start developing again you can save your Workspace in VSCode and store host keys.
Instructions are located at this link and under steps 4 and 5 at this link.
In short you will:
- Check C:\Users\your_user.ssh\id_rsa.pub to see if you have already generated a local SSH key pair (private/public) on your laptop.
- If they are not there use the PowerShell command:
ssh-keygen -t rsa -b 4096 - If OpenSSH is not installed look here.
- If they are not there use the PowerShell command:
- Use PowerShell to copy the local public key to the SSH host Pi:
$USER_AT_HOST="your-user-name-on-host@hostname"
$PUBKEYPATH="$HOME\.ssh\id_rsa.pub"

$pubKey=(Get-Content "$PUBKEYPATH" | Out-String); ssh "$USER_AT_HOST" "mkdir -p ~/.ssh && chmod 700 ~/.ssh && echo '${pubKey}' >> ~/.ssh/authorized_keys && chmod 600 ~/.ssh/authorized_keys"
Lastly you can also use your VNC connection to work remotely on the Pi. In this case you will use a local editor on the Pi. This is however not used in a professional environment.
Backing up your code
Backing up your code is essential to not meet any unfortunate surprises. We will cover three options:
- WinSCP
- Git
- USB stick
Back up files with WINSCP
Download and install WINSCP on your laptop if you haven't already. Using WINSCP you need to log in to the Pi with the correct credentials. Use the IP and the SSH port 22 of the Pi as we are using the SFTP protocol.
After that you can use the drag-an-drop interface to copy files between your laptop and the Pi.
Back up files with Git from the Pi
You have already used Git last semester, if you need a reminder visit the course site .
To back up files using Git from the Pi we need to first log in to the Pi, install and configure Git:
pi@orangepi:~$ sudo apt-get update
pi@orangepi:~$ sudo apt-get install git ssh

pi@orangepi:~$ git config --global user.email "you@example.com"
pi@orangepi:~$ git config --global user.name "Your Name"
Then we need to set up credientials using SSH keys:
- Generate a private-public keypair on the Pi
pi@orangepi:~$ ssh-keygen- Navigate to “/home/orangepi/.ssh”, notice the 2 files
- id_rsa (private key, never ever share)
- id_rsa.pub (this one needs to be copied to github)
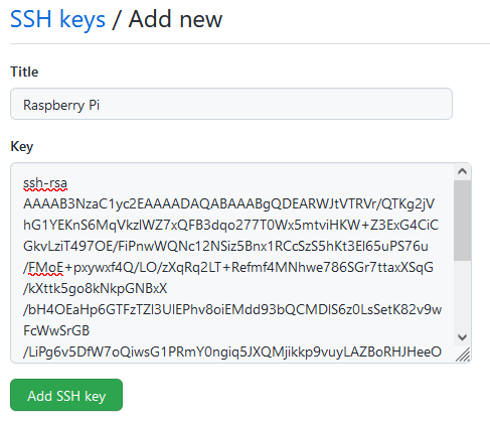
After that we need to log on to Github and go to https://github.com/settings/keys to add an SSH key. To get this key you need to access the aformentioned id_rsa.pub file using the cat id_rsa.pub command. Copy the displayed text and paste it in the browser.
Then create a new repository on Github where you want to save your file(s). Once created, select SSH in the menu and copy the URL.

Back on your Pi, navigate to a folder where you want to save the files and clone the repo.
pi@orangepi:~$ git clone <the_url_you_copied>
pi@orangepi:~$ cd <your_repo_name>
From here on you can use Git as you usually would for other programming projects, now just from your Pi.
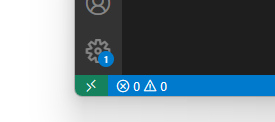
In case you are using VSCode to work remotely on the Pi, and are connected to it, you can use the built-in interface for Git as well. If you open the folder you cloned and create or copy in files, you will see a blue 1 appear in the side ribbon. You can click on this to use the built-in interface.
Back up files using a USB stick
Using a USB stick to back up files is a classic way of working. Do however notice that you should not actively work on the USB stick, use it to back up files.
First of all you should where the Pi system locates the USB device. With the USB device not plugged in, type:
pi@orangepi:~$ sudo tail -f /var/log/messagesThen plug in the USB and look at the new lines that appear.

Press CTRL-C to stop the tail log tracking command. In this case the usb stick id is sda1. That means the USB device is located at /dev/sda1.
Alternatively, you can use this command when the USB stick is plugged in:
pi@orangepi:~$ sudo fdisk -l
Now that we know where the USB device is located at we need to create a directory to mount the USB drive to with read-write rw access.
pi@orangepi:~$ sudo mkdir /media/usbstick
pi@orangepi:~$ sudo mount -f vfat -o rw /dev/sda1 /media/usbstick
Now that the folder is mounted to the USB stick, writing to the directory will write the the USB stick and vice-versa. It is as if /media/usbstick is now the USB stick.

After copying your files to the directory you still need to unmount the USB stick again before pulling it out.
pi@orangepi:~$ sudo unmount /media/usbstickIf the unmount command says the stick is in use, you may have to close any programs using the stick. Or if the current directory is /media/usbstick simply change it to another directory and then unmount the stick.