
Getting Started with the Orange Pi 3 LTS
Getting the Orange Pi 3 LTS up and running can be derived into 3 general steps:
- Installing the OS
- Connecting the Orange Pi to your computer
- Giving the Orange Pi an internet connection
Installing the OS
The operating system of the Orange Pi 3 LTS needs to be installed on a MicroSD card. To start off, download Balena Etcher and install it. You will use this tool to put the OS image on the MicroSD card.

For the OS, in general there are two alternatives to choose from:
Installing the custom modified Debian image posted on Canvas, named 240115_opi24fixedip.img.xz. This image has a preconfigured static IP addres and hostname so that you can connect to your computer without any additional settings on the Pi:
- ✅ You can download it before you come to class
- ✅ It has a static IP that you can use with ethernet
- ✅ Wi-Fi is pre-configured
- ⚠ No custom hostname or other Wi-Fi-connection
- ⚠ AZERTY-keyboard
Installing a standard image from orangepi.com without any modifications. If so, choose the official Debian image here as well. In this case you will need an external monitor and keyboard to do the initial configuration of the Pi.
When the Balena Etcher software has finished flashing the image onto the MicroSD card, insert it into the Orange Pi.
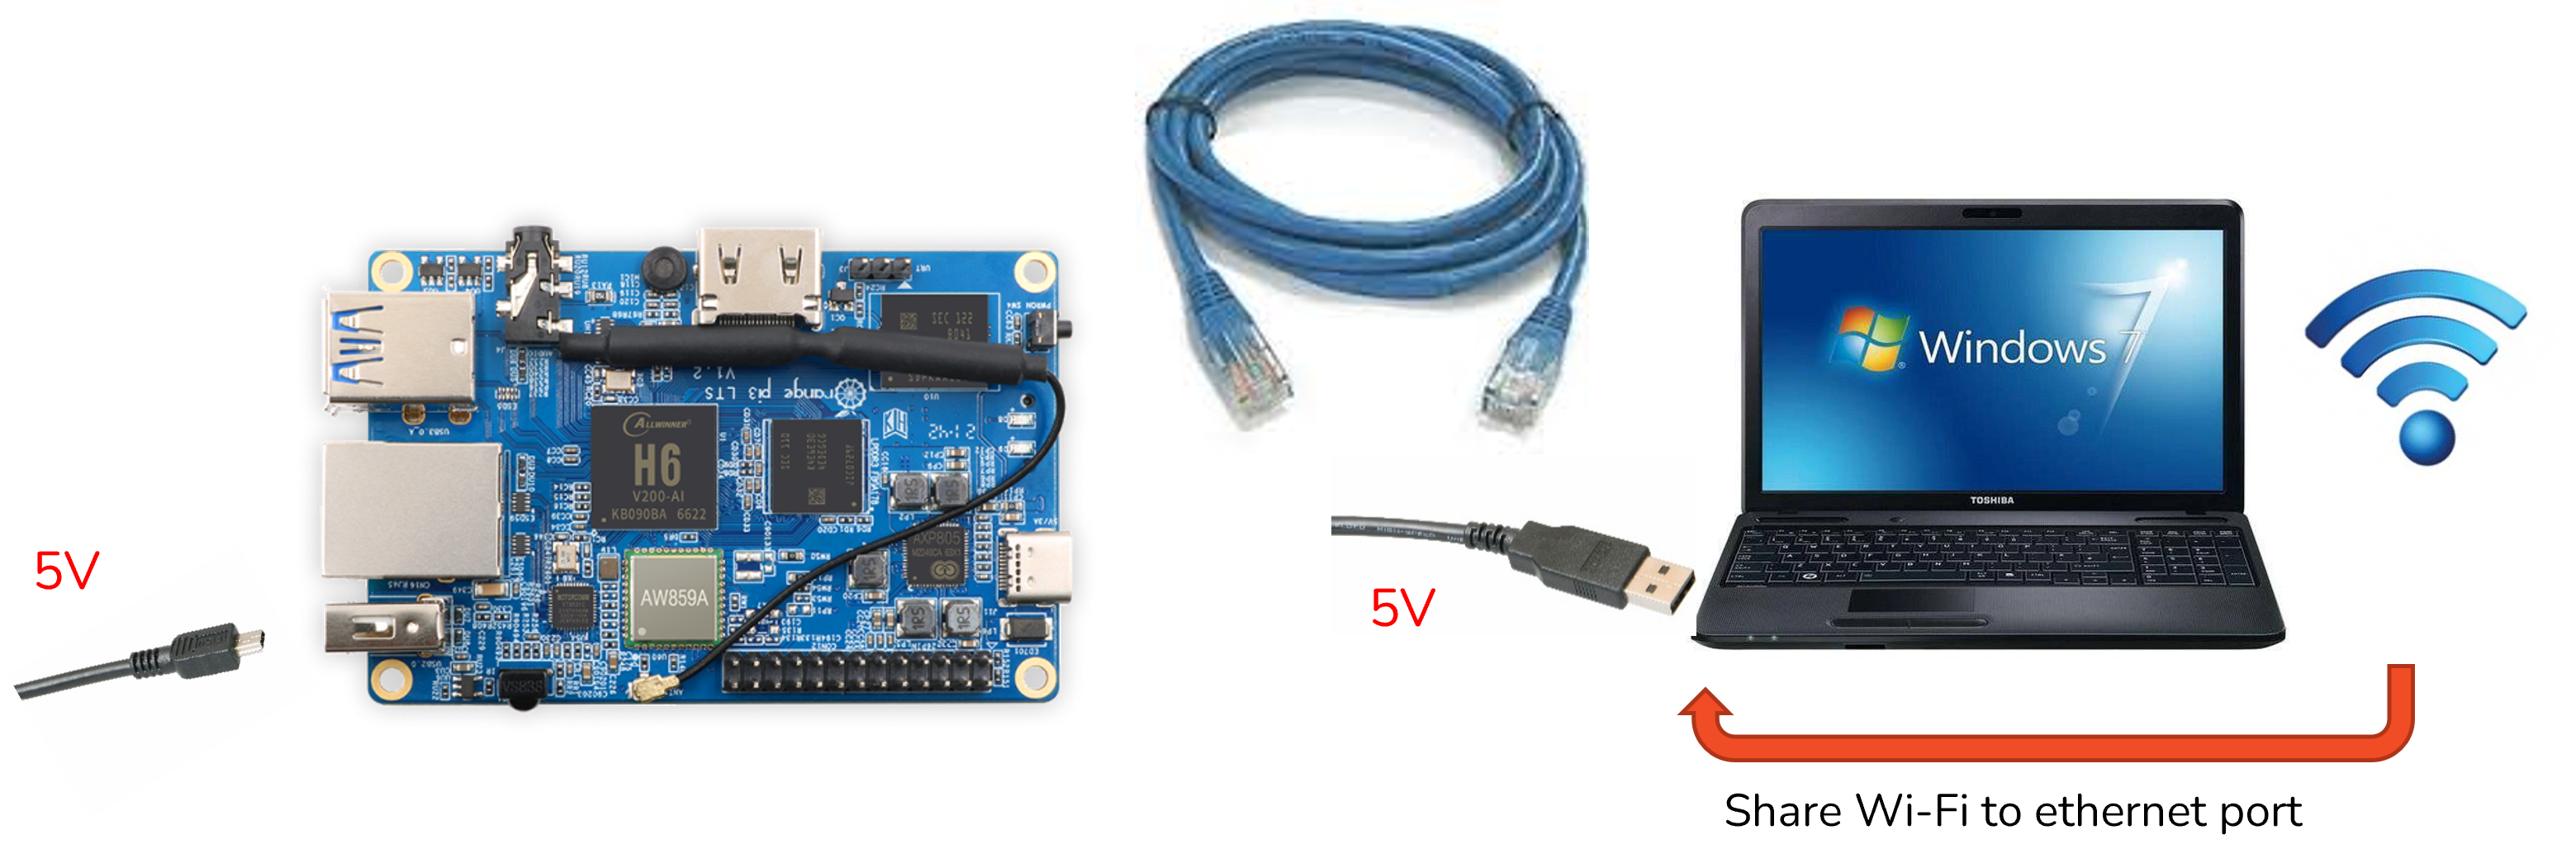
Then the Orange Pi needs to be powered from the USB-C slot. You can connect it via the USB slot of your computer, but it might not provide enough current to function properly. A USB power supply cable might then be a better choice, provided that it delivers 3A of current.
Connecting the Orange Pi to your computer
Making a data connection to your computer will not be done through the USB-C connection but via an ethernet cable instead.
The custom image provided on Canvas already has the ethernet interface of the Orange Pi set up with a static IP of 192.168.137.2 and default gateway of 198.168.137.1.
If you have the default standard image, not from Canvas
If you have used the standard image from orangepi.com without any modifications you will now first need to connect a monitor and keyboard to your Orange Pi to set a static IP on its ethernet interface:
- IP: 192.168.137.2
- Subnet mask: 255.255.255.0
- Default gateway: 192.168.137.1
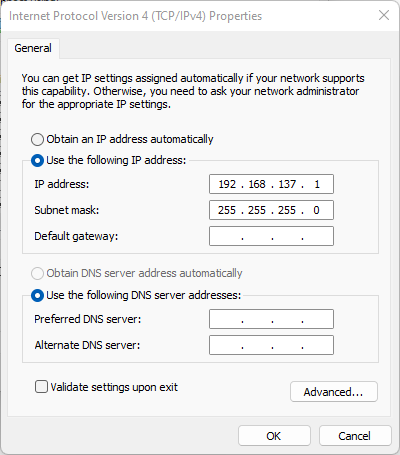
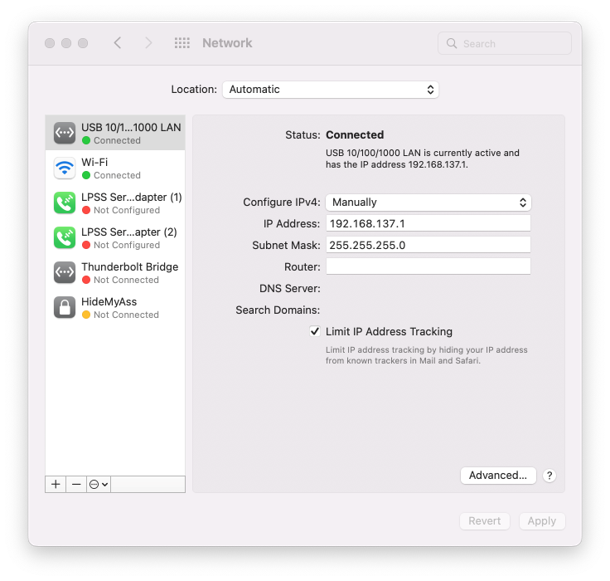
The next step will be to configure the ethernet port of your laptop with a static IP address in the same subnet as the Orange PI, as follows:
- IP: 192.168.137.1
- Subnet mask: 255.255.255.0
- Default gateway: Leave blank
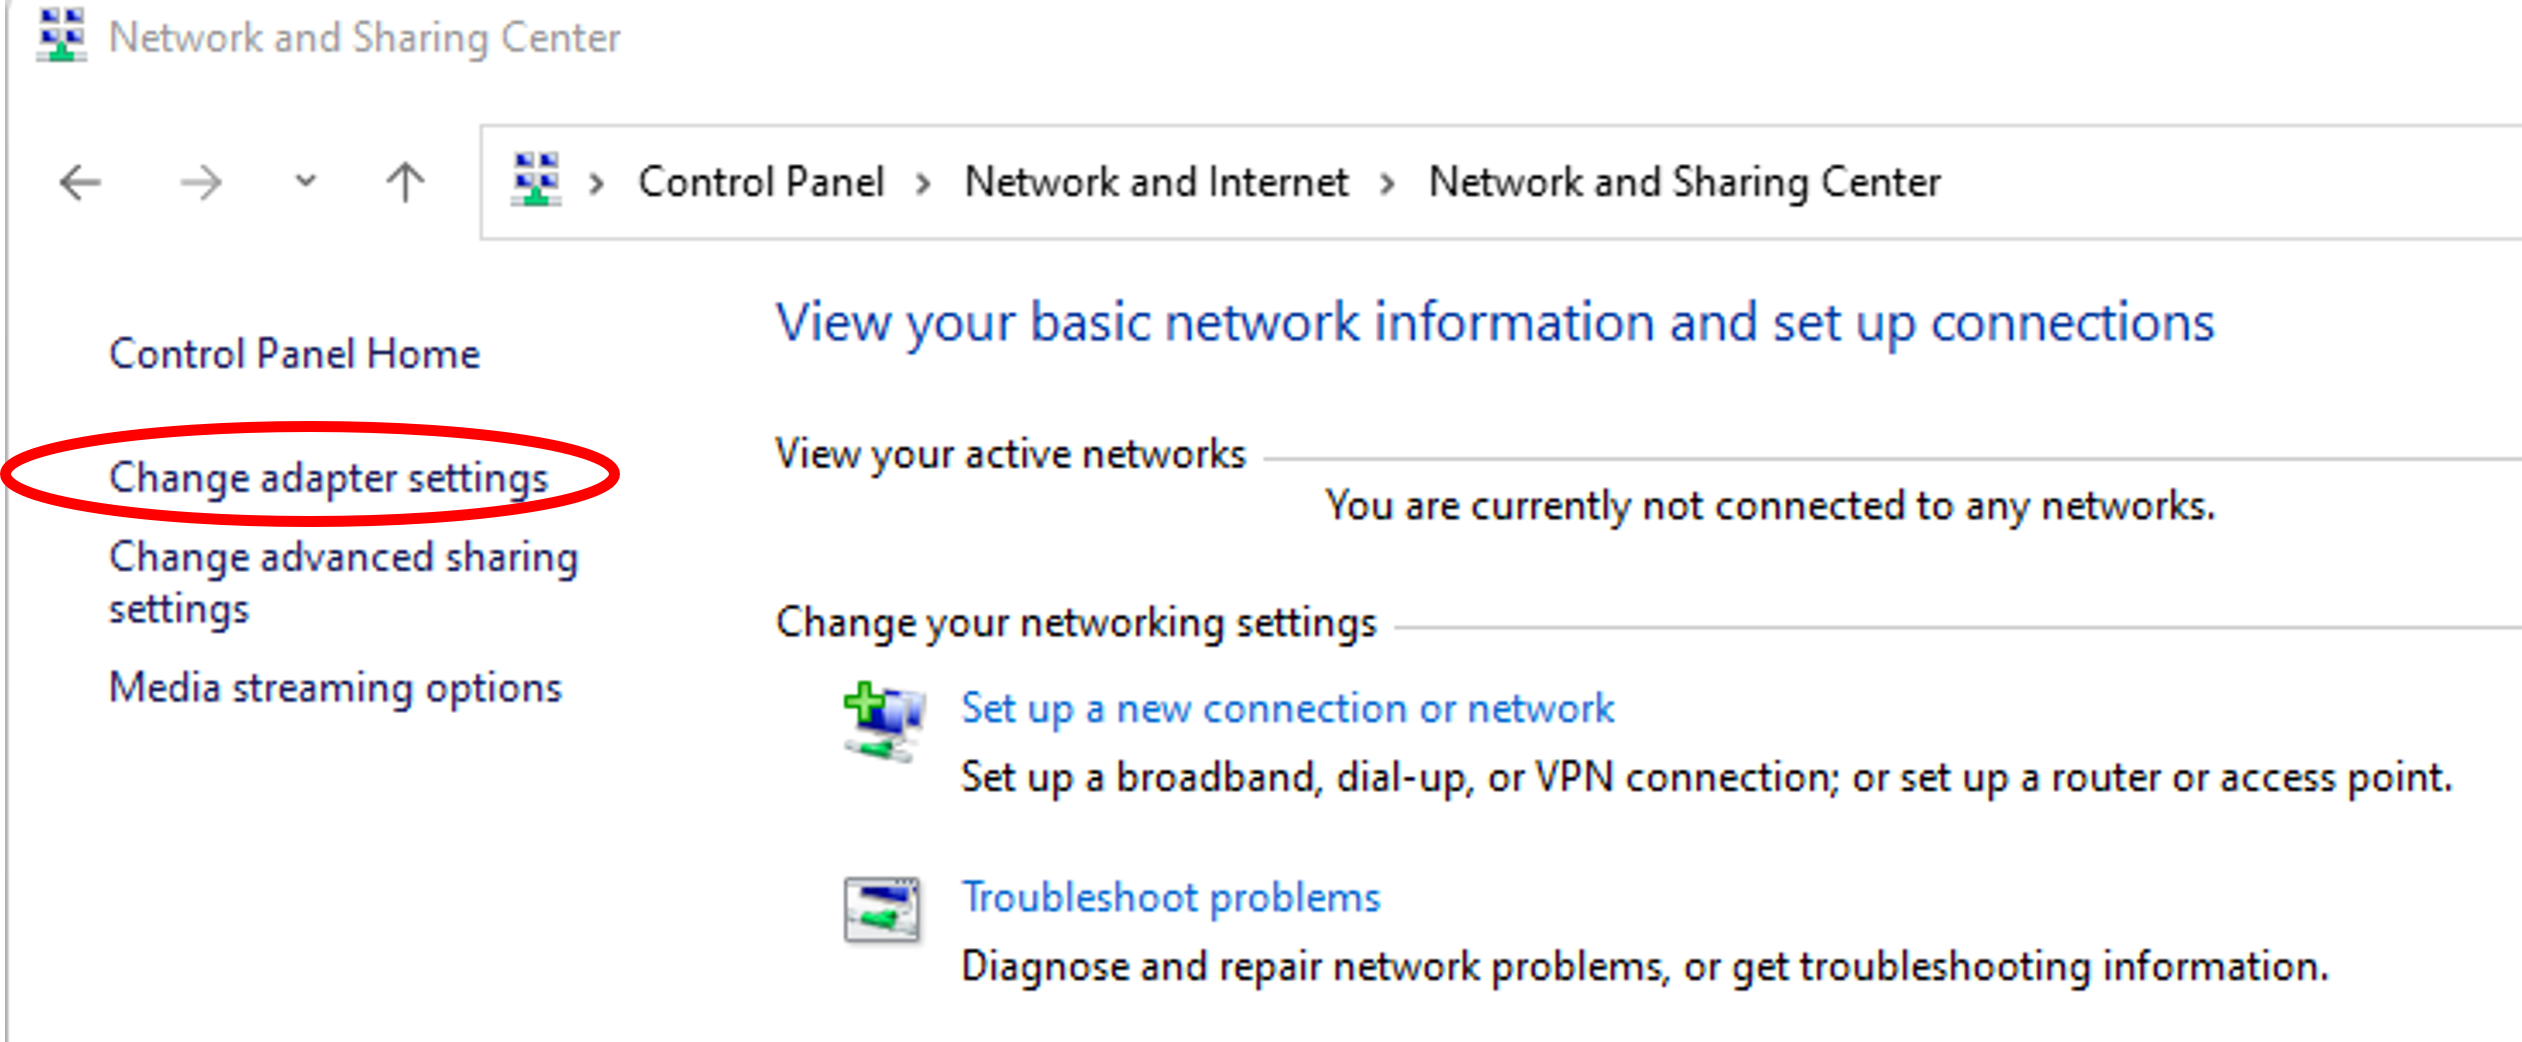
For Windows
Go to the Network and Sharing center of the Control Panel and select Change adapter settings
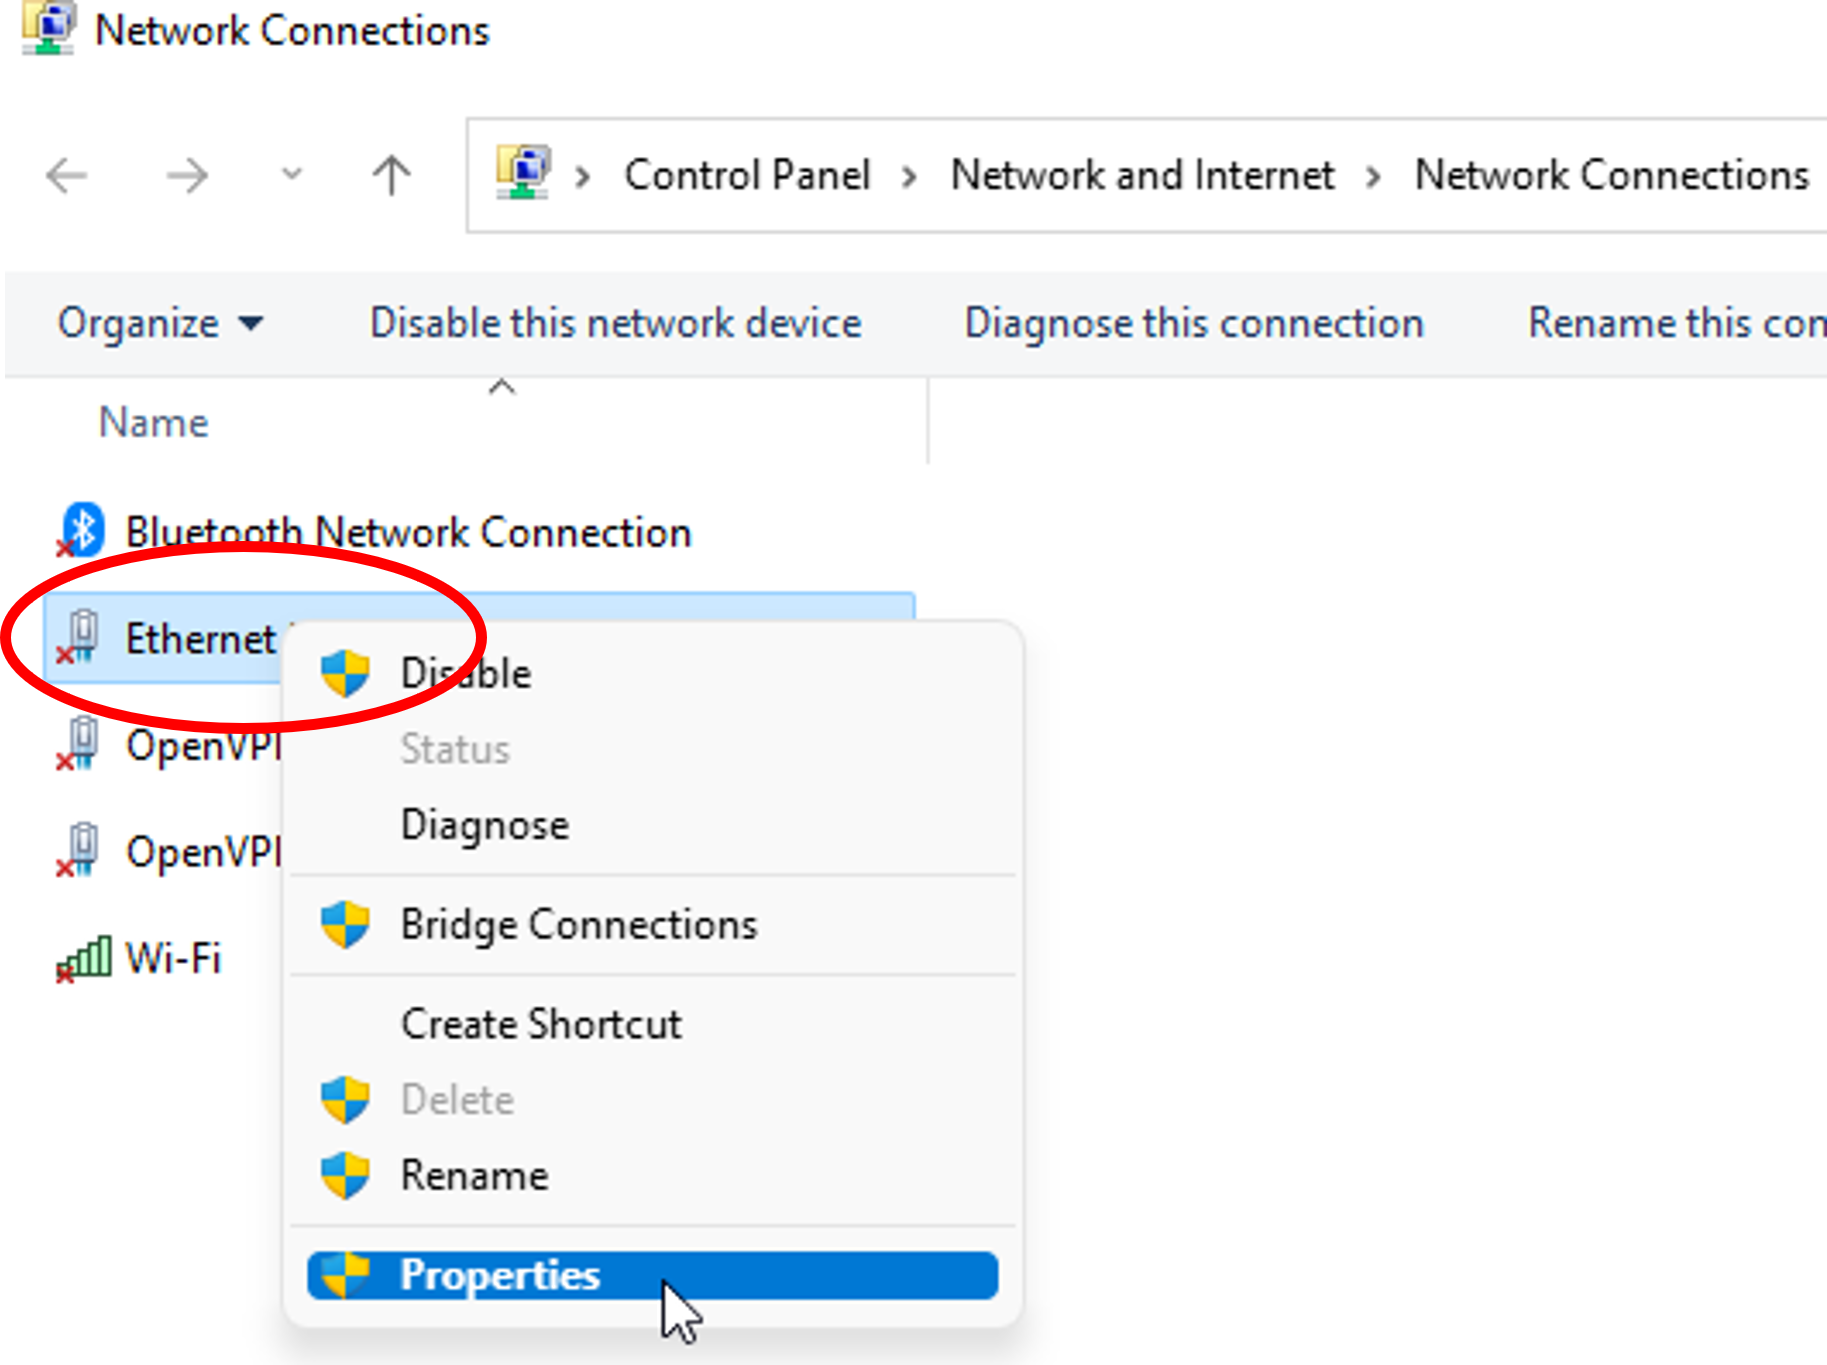
Go to the properties of your ethernet adapter
Go to the properties of the Internet Protocol Version 4
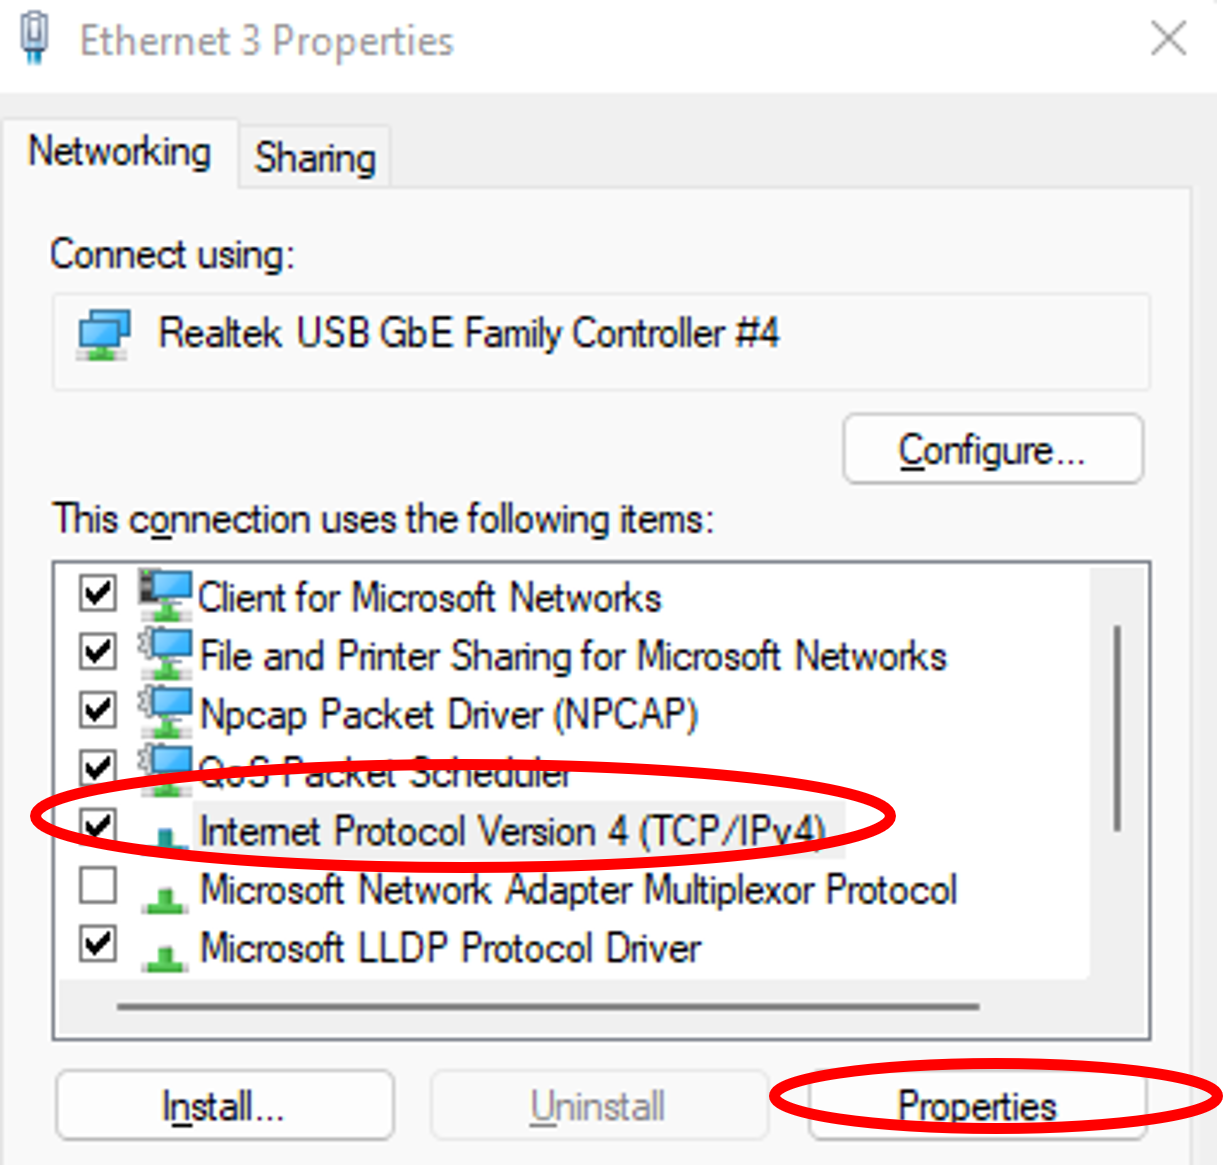
Set the following settings
For Mac
- Go to Network Preferences - Ethernet
Opening the connection to the Orange Pi via SSH
Secure Shell (SSH) is a protocol used to securely log onto remote systems. It is the most common way to access remote Linux servers. SSH works by connecting a client program to an ssh server, called sshd. On nearly all Linux environments, the sshd server should start automatically. If it is not running for any reason, you may need to temporarily access your server through a local serial console or connect a monitor and a keyboard.
The SSH port is the port used by the SSH protocol to establish a secure connection between two devices. The default port for SSH is 22. However, it is possible to configure SSH to use a different port if desired.
On itself a port is a virtual point where network connections start and end. While IP addresses enable messages to go to and from specific devices, port numbers allow targeting of specific services or applications within those devices. Ports are software-based and managed by a computer's operating system. Each port is associated with a specific process or service. Ports allow computers to easily differentiate between different kinds of traffic: emails go to a different port than webpages, for instance, even though both reach a computer over the same Internet connection. Ports are standardized across all network-connected devices, with each port assigned a number. Most ports are reserved for certain protocols — for example, all Hypertext Transfer Protocol (HTTP) messages go to port 80.
If you used a clean Debian install instead of the premade image from Canvas
SSH is disabled by default. On the premade image we have enabled it for you, but if you used a clean Debian install you will need to enable it yourself first.
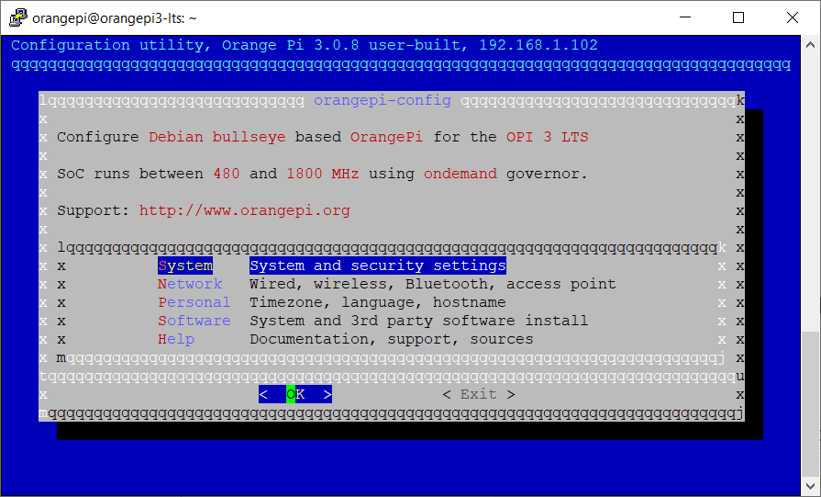
pi@orangepi ~$ sudo orangepi-config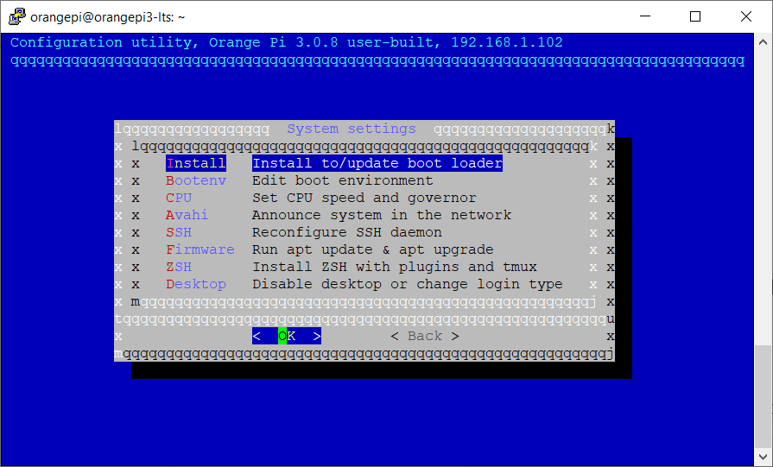
To make this connection we can use a lot of tools. Amongst those there are two tools we will use.
Via SSH tool PuTTY
 PuTTY is a free and open-source terminal emulator, serial console and network file transfer application. It supports several network protocols, including SCP, SSH, Telnet, rlogin, and raw socket connection. You can download the latest version of PuTTY for Windows, Linux and Mac operating systems from here.
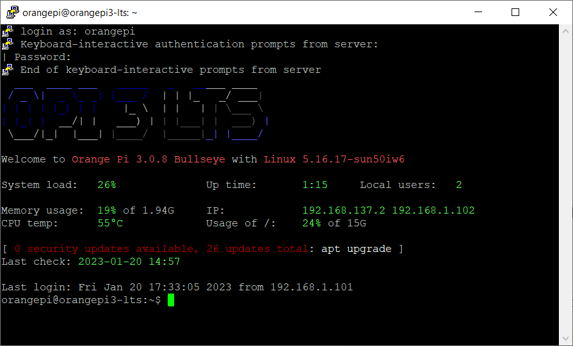
Once installed, we can use it to connect to our Orange Pi securely via SSH. IP address of your PI here is 192.168.137.2 or you can use the hostname of your PI if DNS is enabled:
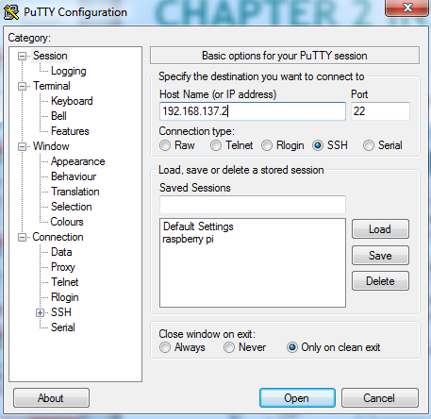
When PuTTY has made the connecting, use the following credentials to log in:
- Username: orangepi
- Password: orangepi
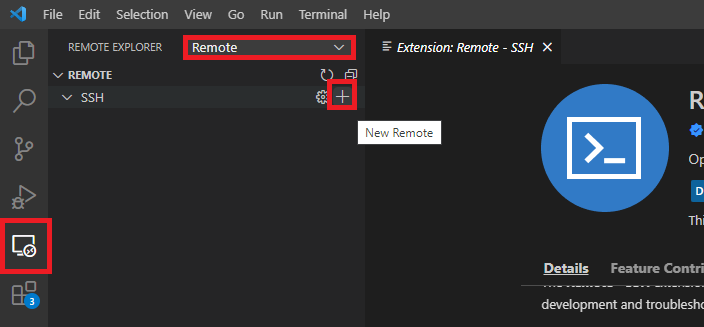
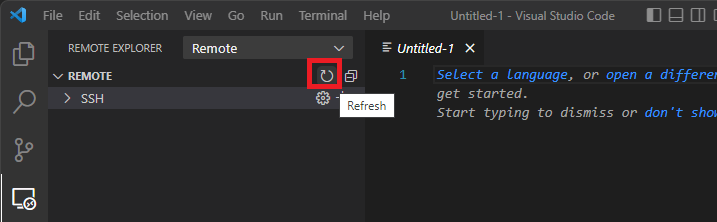
Via SSH in Visual Studio Code
 Visual Studio Code (VSCode) is a free and open-source code editor that is optimized for building and debugging modern web and cloud applications. It is available on Linux, macOS, and Windows operating systems. You can use it to write, edit, and debug code in various programming languages such as JavaScript, Python, C++, Java, and more. It also supports extensions that can be used to add new languages, themes, debuggers, and to connect to additional services.
The main difference with editors like Pycharm is that VSCode is free and open-source, made to work with multiple languages instead of in-depth with one specific language and is less demanding on your machine.
You can connect Visual Studio Code to an Orange Pi 3 via SSH Visual Studio Code:
- Install Visual Studio Code
 Install the Remote-SSH extension on Visual Studio Code. You can do this by clicking on the Extensions icon on the left sidebar, searching for "remote", and installing the Remote-SSH extension.
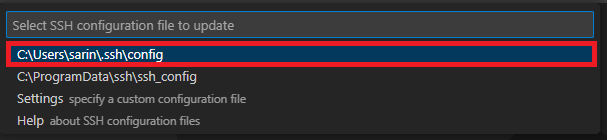
- Establish an SSH connection with your Orange Pi 3 by following these steps:
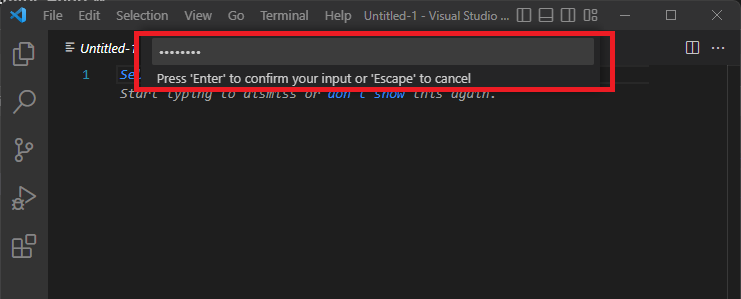
Insert the configuration for your Orange Pi 3: connection command with user@IP: orangepi@192.168.137.1
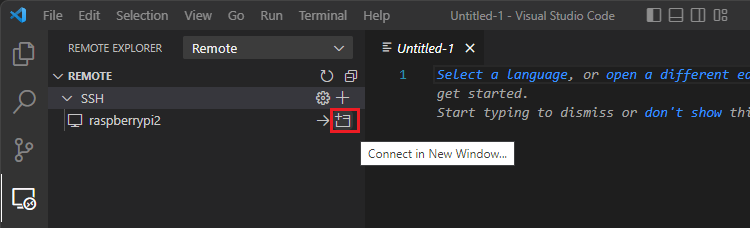
Use the password: orangepi
Check that the Remote SSH has connected. It will take a moment to connect, then the green SSH Status in the bottom lefthand corner of Visual Studio Code will change to >< SSH:your_orange_pi_3.
Once you have established the SSH connection, you can create files, write code, and execute it directly on your Orange Pi 3 board from your computer using the Visual Studio Code interface.
Via the ssh command in the Mac Terminal
- Check the connectivity in Terminal
ifconfig
ping 192.168.137.2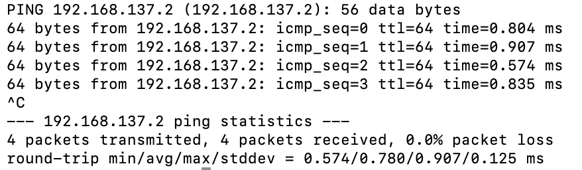
ssh orangepi@192.168.137.2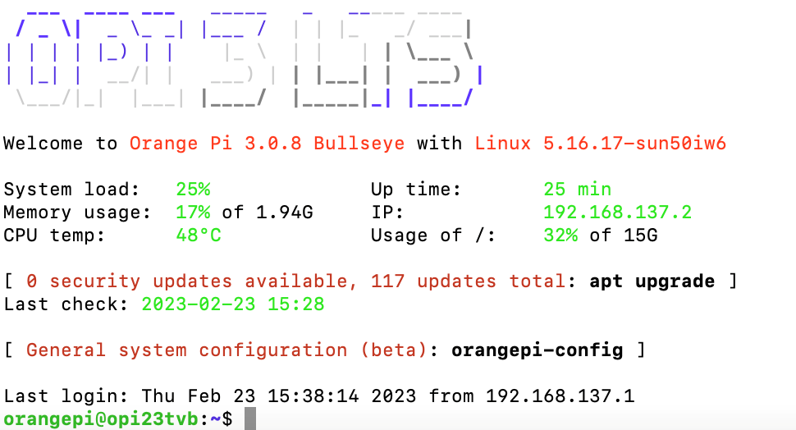
Taking a note of the IP address of the PI
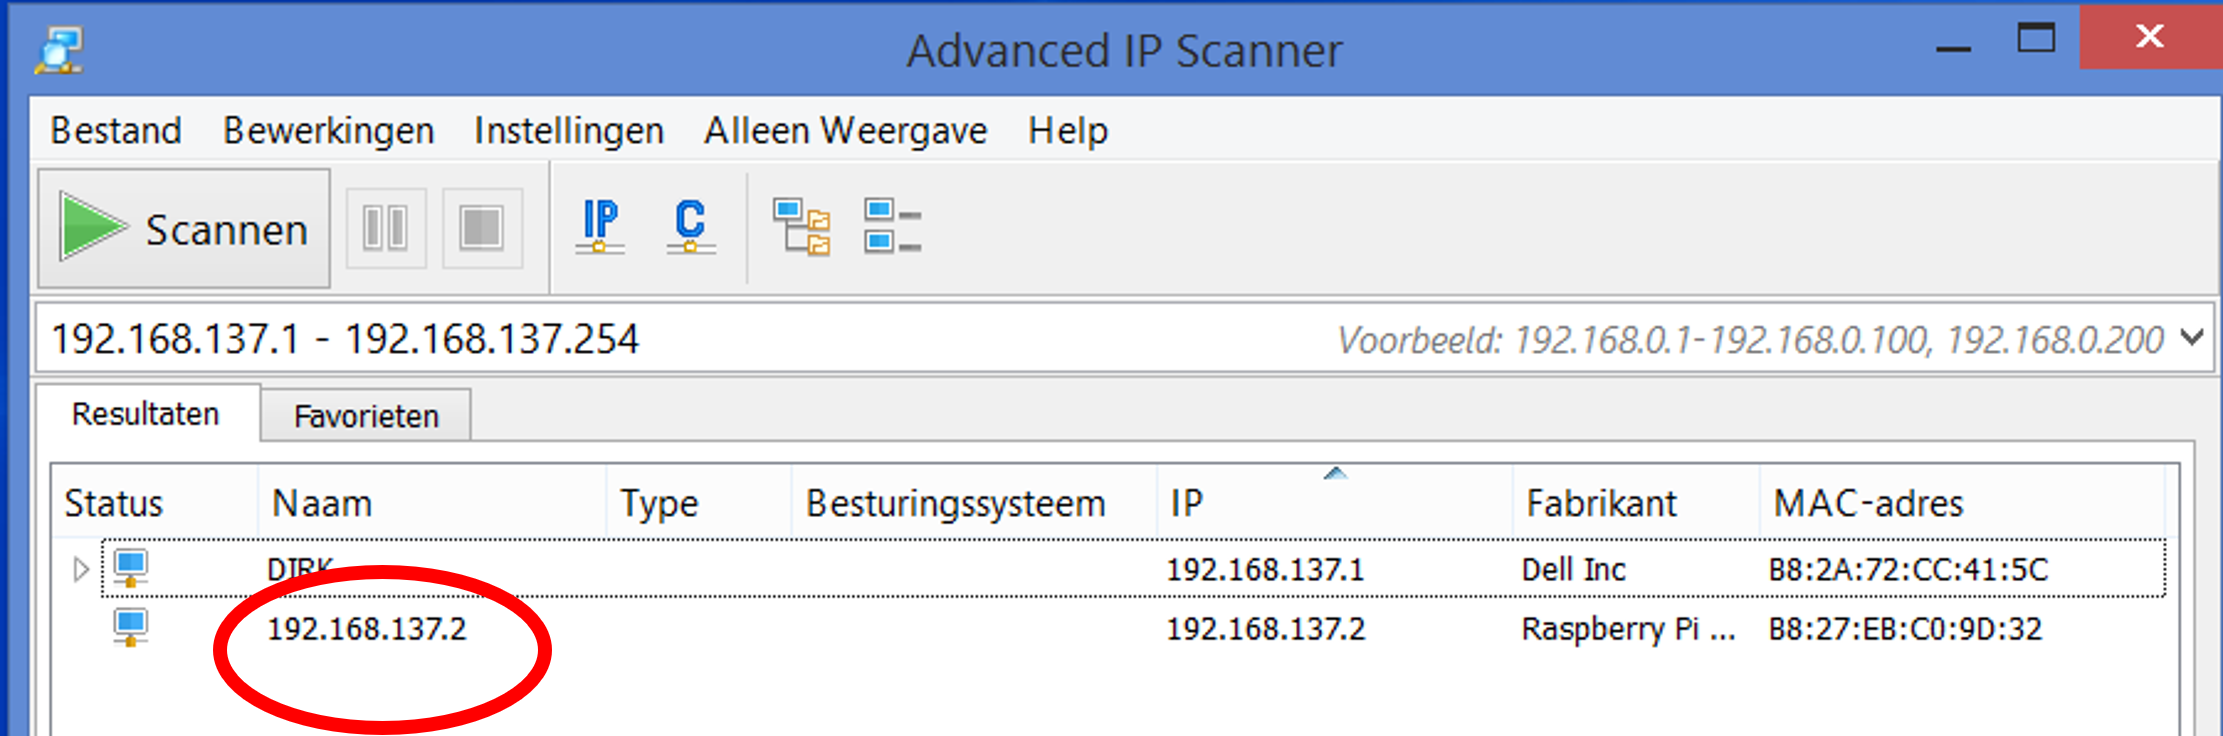
It is always a good idea to note down the current ethernet and wifi IP addresses of the Pi. To do this you can:
- Use the
ip addrcommand on the Pi:
pi@orangepi ~$ ip addr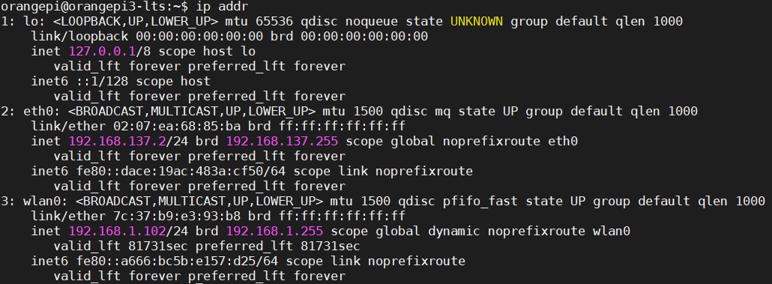
- Login to the router you're connected to and look in its configuration table
- Use the IP scanner program on your laptop in the same network subnet
Giving the Orange Pi an internet connection
These steps are for sharing your laptop’s internet connection with the Orange Pi by connecting the Pi to the LAN port of your laptop.
On Windows
- Connect the PI to the LAN port of your laptop
- Share wireless port to ethernet so the Pi will have internet connection. The LAN port will get an IP address automatically (192.168.137.1):
- The PI has IP address 192.168.137.2 and will be in the same subnet as your laptop 192.168.137.1
- Disable the firewall on your laptop or set port 22 SSH enabled if necessary.
- The Pi now has an internet connection. Test with a ping to google DNS (use SSH):
pi@orangepi ~$ ping 8.8.8.8- Also ping with hostname to check DNS config:
pi@orangepi ~$ ping www.google.be
PING www.google.be (64.15.124.216) 56(84) bytes of data.
64 bytes from cache.google.com (64.15.124.216): icmp_req=1 ttl=58 time=16.1 ms
On Mac
Restrictions for Mac
You can NOT use this on a Mac to share the TM Intern network as 802.1X sharing not supported on Mac. You can share a 4G hotspot or Home wifi.
- Share the wireless port to LAN so the Pi will have internet connection
System Preferences - Sharing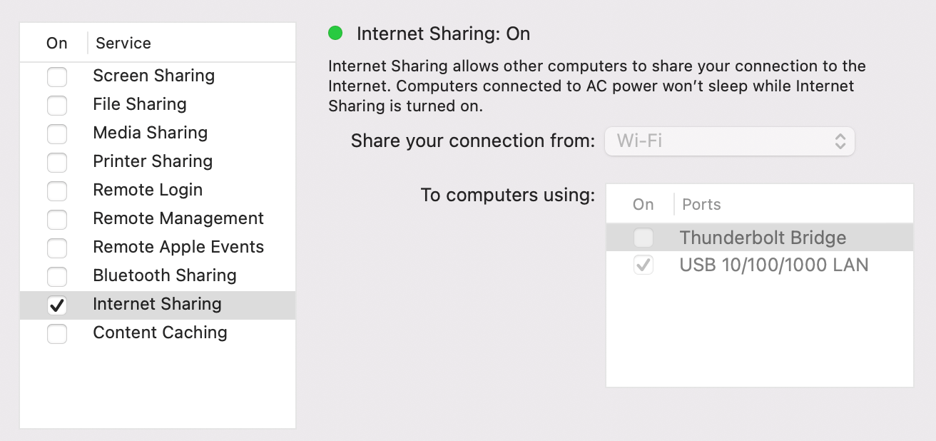
Customizing your setup
After the initial setup you should then also change the hostname, timezone and default password.
Changing the hostname and timezone
To edit these default settings on your Pi:
pi@orangepi ~$ sudo orangepi-configEdit the following settings Under Personal:
- Hostname (Choose a unique name!)
- Time zone (set to Europe/Brussels)
Changing the default password
Change the default password to a personal one using:
pi@orangepi ~$ passwd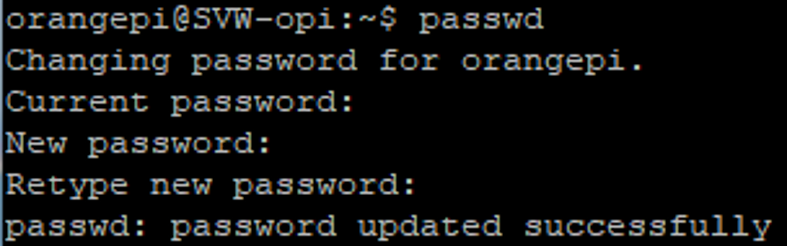
Changing the IP configuration if needed
TIP
You can always check the official Debian docs to find instructions on how to change these settings.
You have two options to change the IP configuration:
- Editing IP settings at /etc/network/interfaces
pi@orangepi ~$ sudo nano /etc/network/interfaces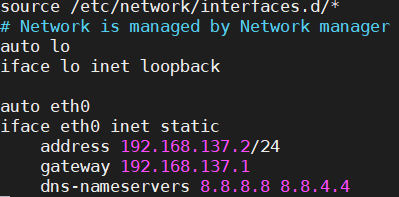
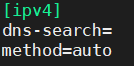
- Editing IP settings at /etc/NetworkManager/system-connections. Here you need to edit a specific connection, like
Wired connection 1.nmconnection
pi@orangepi ~$ cd /etc/NetworkManager/system-connections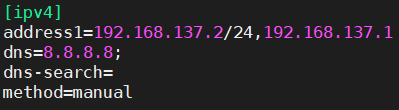
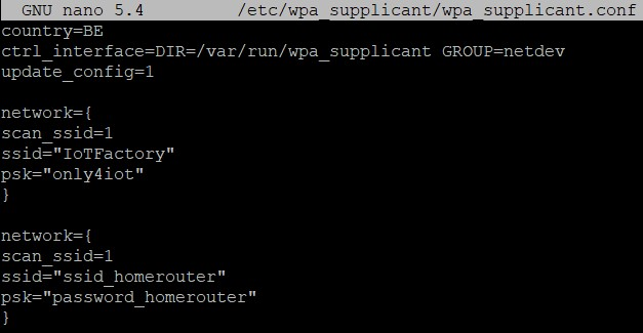
Adding your home Wi-Fi to the Pi
Edit the file /etc/wpa_supplicant/wpa_supplicant.conf
pi@orangepi ~$ sudo nano /etc/wpa_supplicant/wpa_supplicant.confYou can also insert the SD card back into your laptop and use Paragon and Notepad++ on your laptop to edit the actual contents of the SD card.
Once you are editing the file, add an extra network:
Debugging your setup
TIP
If you ever need to, you can also insert the SD card back into your laptop and use Paragon and Notepad++ on your laptop to read and write the actual ExtFS format contents of the SD card:
- Open paragon ExtFS as administrator (right click on paragon) and mount the SD card
- With a simple text editor you can open the unix files
Only to this when something is really broken! Try the other steps first.
SSH connection works, but the PI doesn’t have Wi-Fi
You can go trough a number of troubleshooting options:
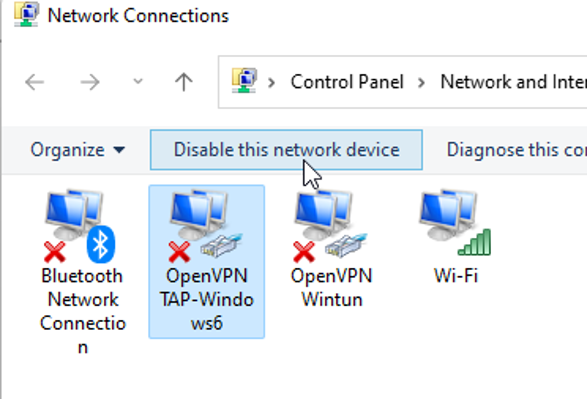
- Try to disable an Ethernet adapter that was installed to be used for virtual machines
Make sure your laptop is in the same network as the OPi: Ethernet 192.168.137.x or the IoTFactory classroom Wi-Fi network on campus
If you can’t connect using hostname, try the IP. You can find out the IP the Pi received by checking your router or using an IP scanner
If the Pi doesn’t show up in the router via Wifi, connect it to the router using an ethernet cable. The Pi doesn’t need a username and password to connect to cabled ethernet. At that point it should show up in the router's table. Use the ethernet connection you have now to setup and debug Wi-Fi
If it’s working sometimes, off-and-on, you can try using a bigger power supply
You used the default image without a static ip
You used the default image without a static ip and installed your Pi, added your Wi-Fi network but you still can’t connect? Or your setup was working at school or at home but now you’re in a different place and it’s broken.
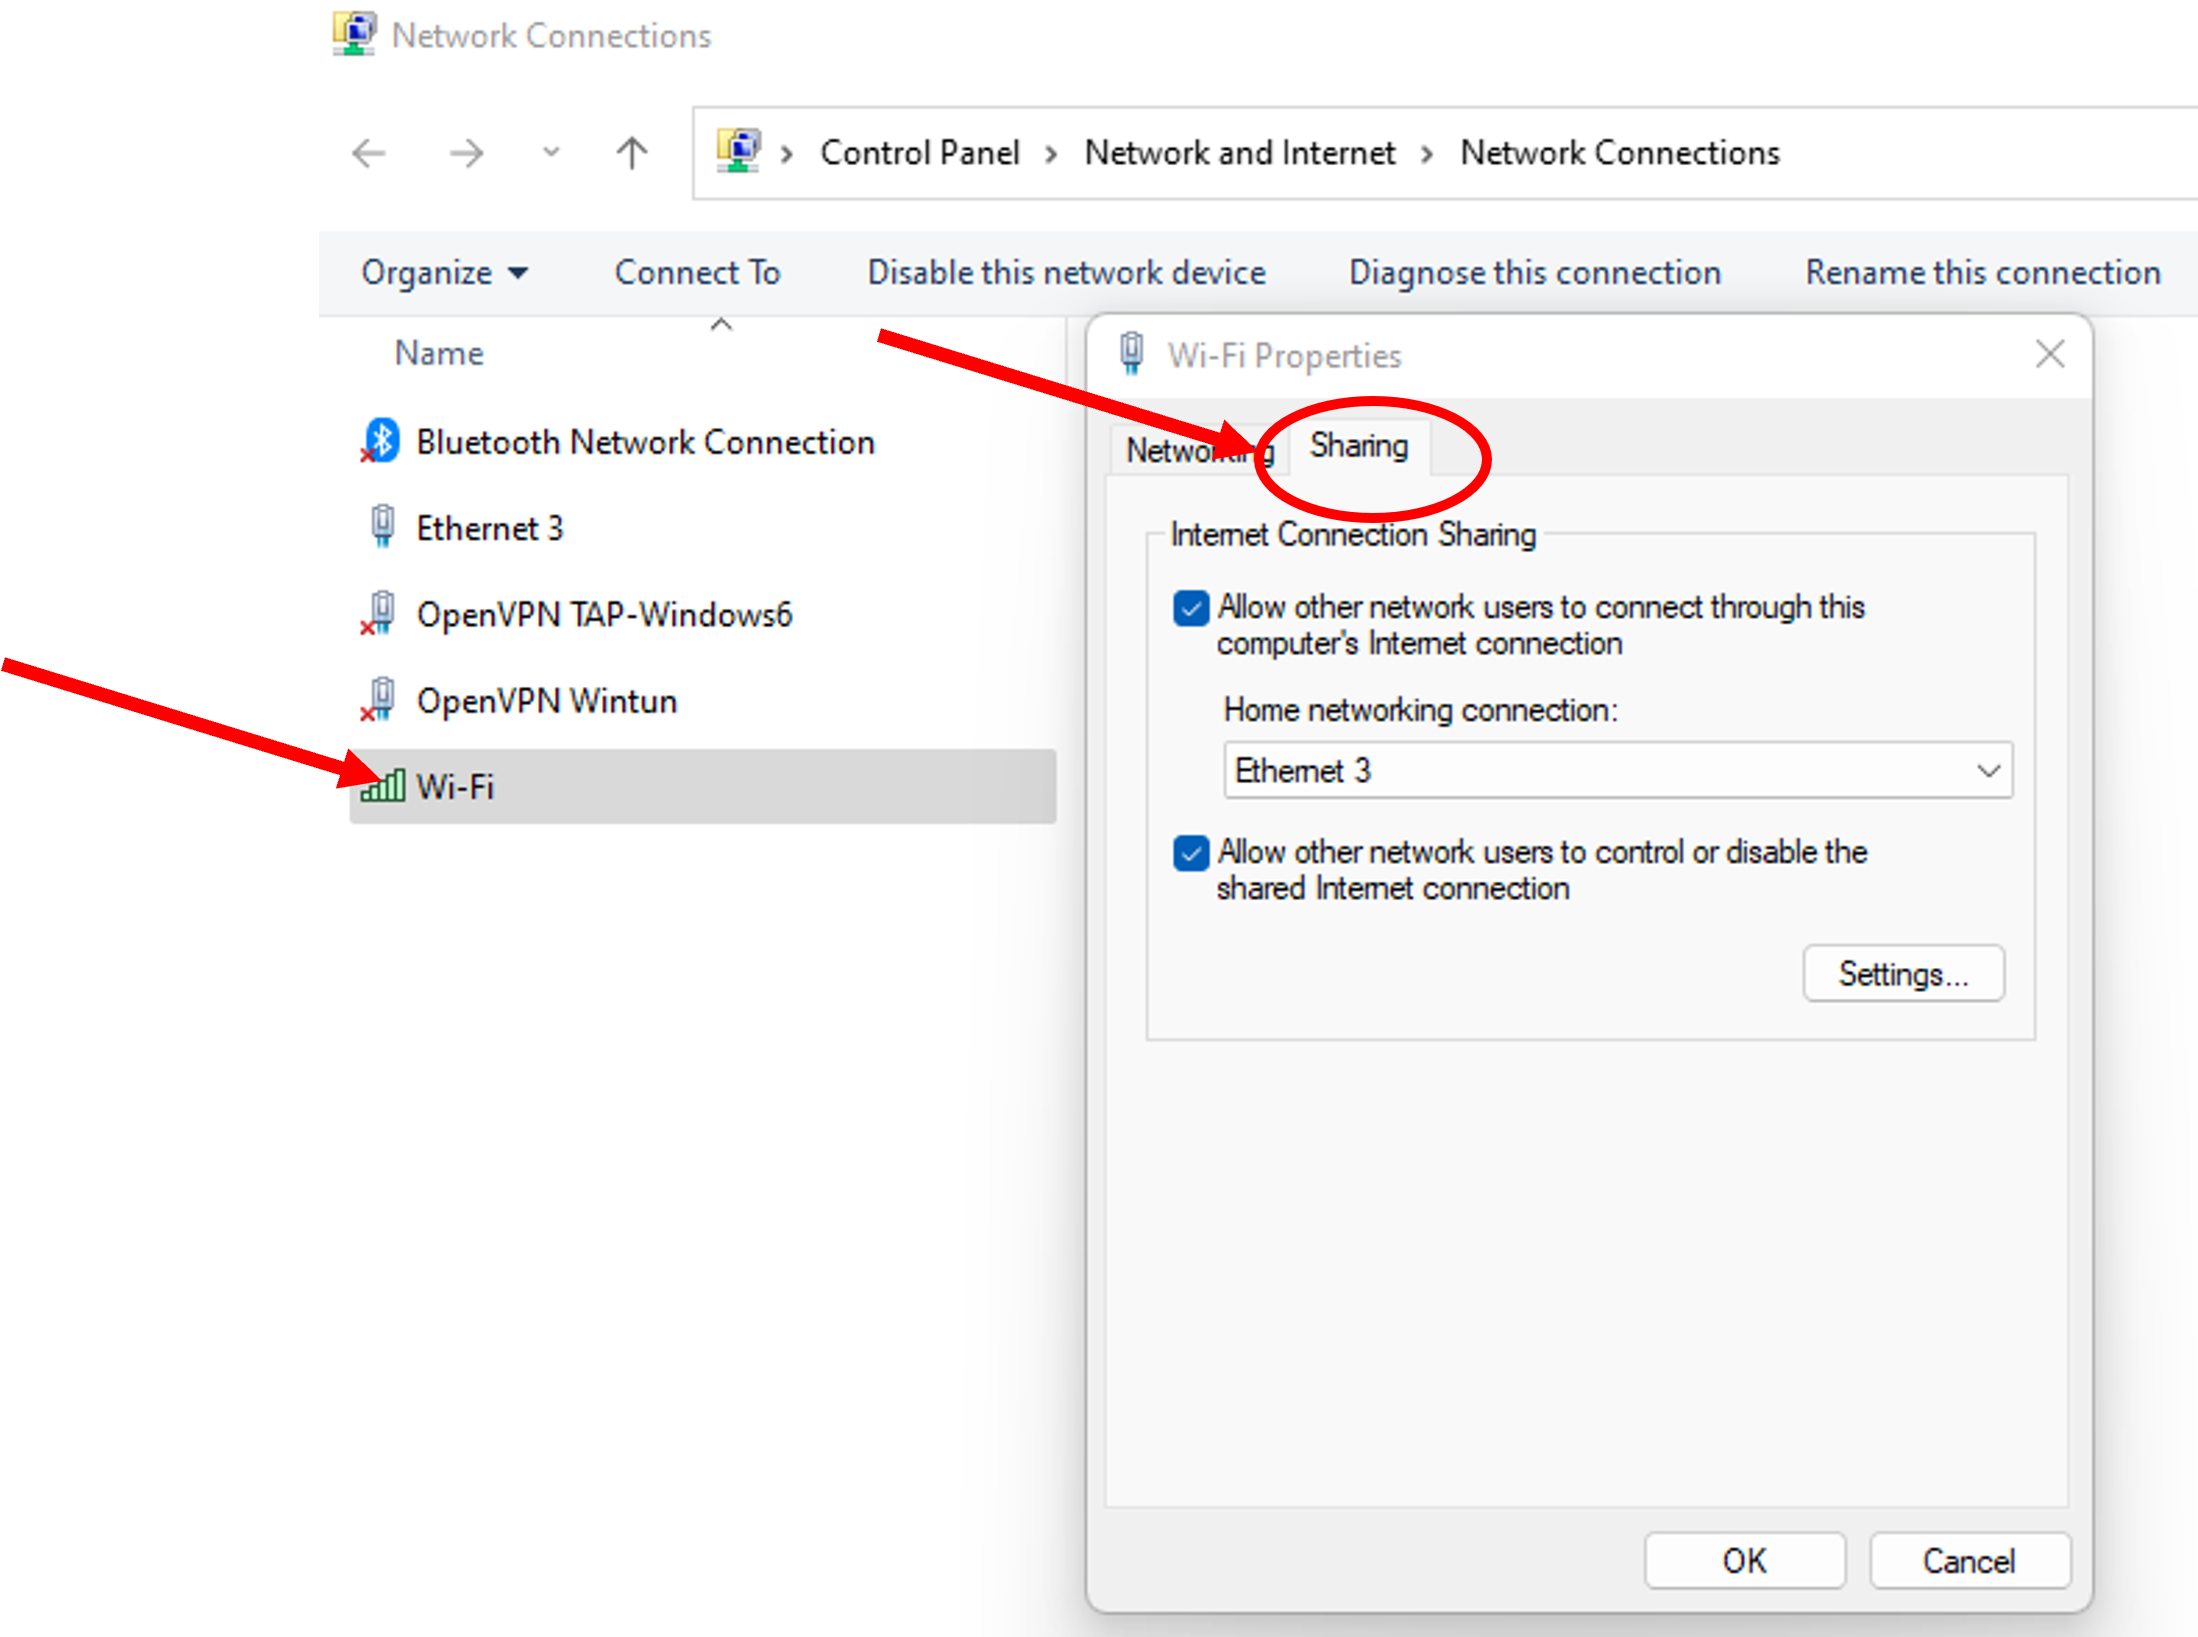
1. Share the Wifi over the ethernet connection (again)
- Open network connections (or Windows-key + R, run “ncpa.cpl”)
- Right-click your Wi-Fi
- Click the Sharing tab
- Allow other network users to…
- Select the ethernet-connection
- Click Ok
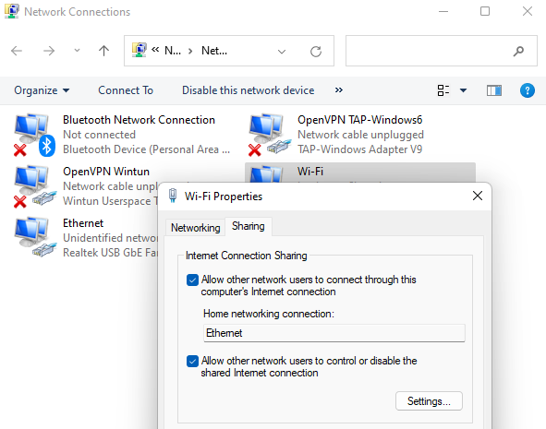
If you hadn’t setup your ethernet with a static IP yet that will happen now No need to further look into that
2. Connect the Pi
It is important to follow these steps in this exact order!
- Connect the ethernet-port or your laptop to the Pi
- Power on the Pi
- Wait for the green led on the Pi to stop blinking fast
Now your computer should have given the Pi an IP and you can use this to connect it.
3. Get the IP
- Open a command prompt
- Ping the hostname of your Pi with
.localbehind it with-4option to make sure we’re using IPv4 - Copy the IP
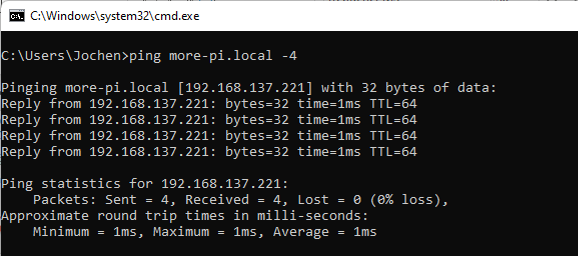
4. Connect using the IP
Now, the first time you connect the Pi you need to use the IP, not the hostname. If you use the hostname, you may get “connection refused”.
Once connected you can start debugging the Wi-Fi, or simply keep on working using the ethernet cable.
Also note that SSH is disabled by default on the default image. On the premade image we have enabled it for you, but if you used a clean Debian install you will need to enable it yourself first.
pi@orangepi ~$ sudo orangepi-configUsing RealVNC for a remote desktop experience
RealVNC is a software that allows you to remotely access and control your computer or device from another device. It uses a protocol called Virtual Network Computing (VNC) to transmit the screen, keyboard, and mouse events between the devices. If you want you can use RealVNC to connect to our PI.
Setting up a VNC connection
- Install the VNC Server on your Pi.
You can do this by running the following command in the terminal:
pi@orangepi ~$ sudo apt update
pi@orangepi ~$ sudo apt -y install tightvncserver xrdp- Run the VNC Server
pi@orangepi ~$ sudo vncserver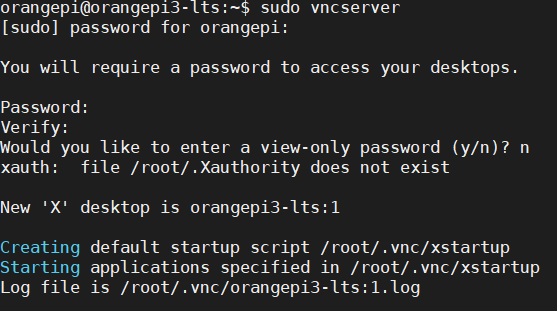
You can stop and restart the VNC Server by using:
pi@orangepi ~$ sudo vncserver -kill :1
pi@orangepi ~$ mv ~/.vnc/xstartup ~/.vnc/xstartup.bak
pi@orangepi ~$ sudo vncserver- Install RealVNC Viewer on your remote device and connect.
You can download it from here.
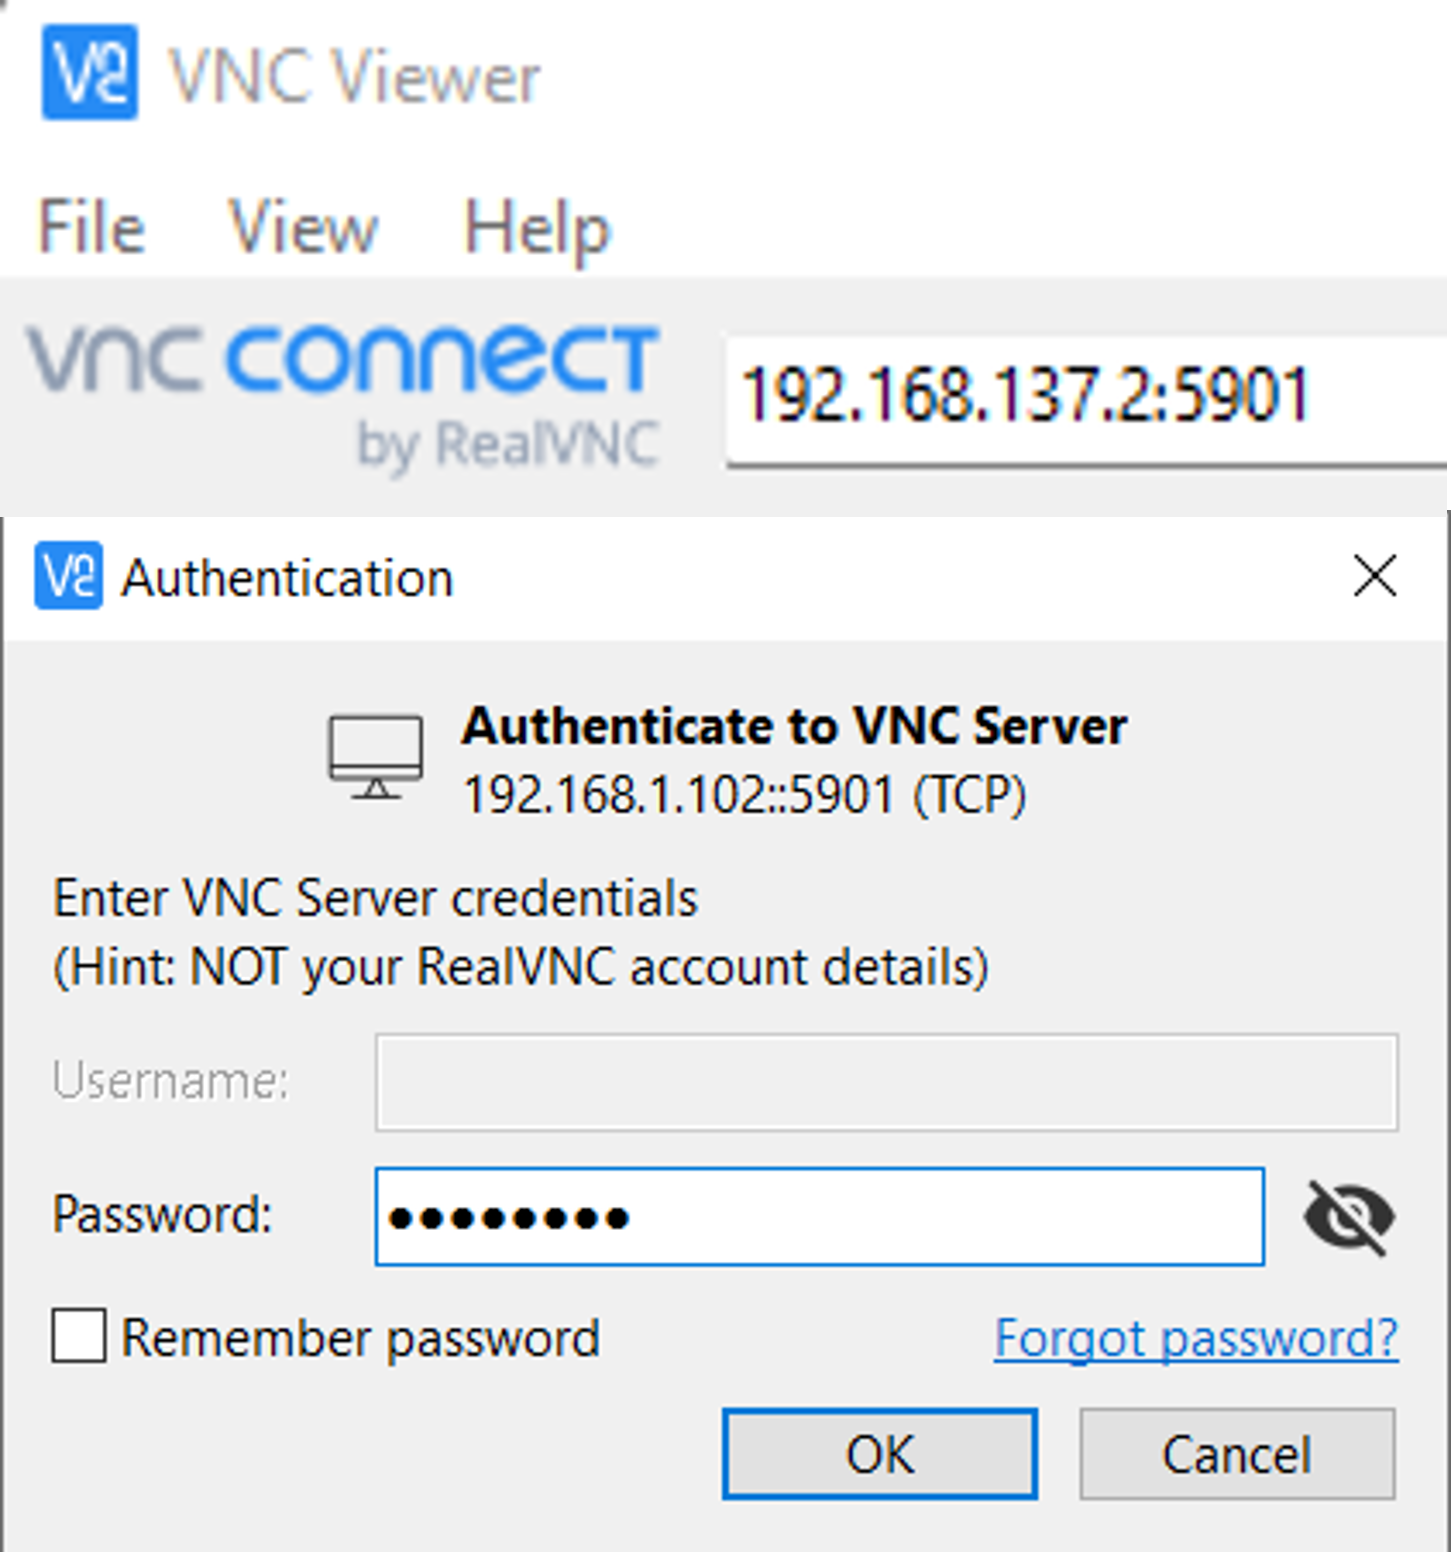
You need to know the IP address and the port number of your Pi. The port number is usually 5901 by default. Open RealVNC Viewer and enter the IP address and the port number in the format ip_address:port_number. For example, 192.168.137.2:5901. Then enter the password and click ‘Connect’.
You should now be able to see and control your Pi device from your remote device using RealVNC.

Debugging the VNC connection
The following time out error may sometimes appear:
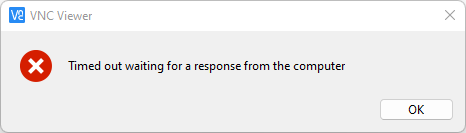
In this case you can try to create an SSH tunnel using Putty:
Right-click on grey top-bar of Putty when it is connected
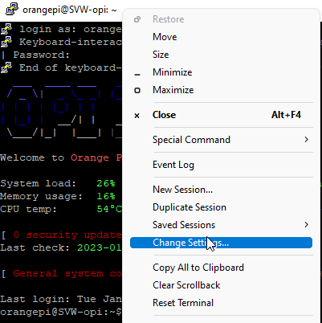
Select “Change Settings”
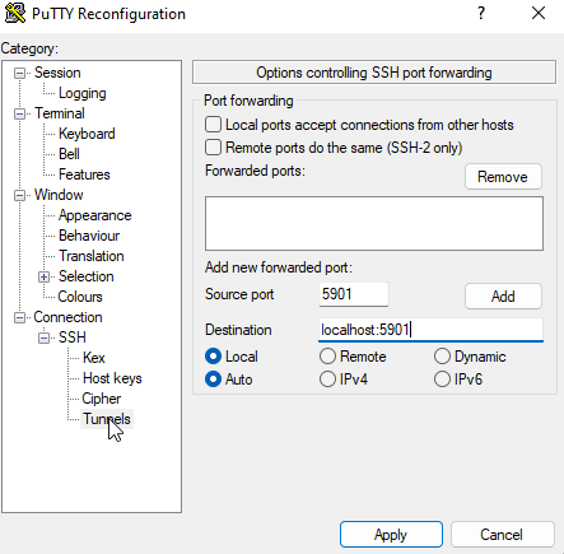
Go to Connections -> SSH -> Tunnels:
- Source port =5901
- Destination = localhost:5901
- Click “Add”
- Click “Apply”
For more details and instructions, you can check out these web pages: